sonavor
Forum Replies Created
- AuthorPosts
-
Fantastic Keith!
Any other issues available that you could scan?
December 5, 2023 at 5:19 pm in reply to: BEOMASTER 5500 RECEIVER – PHONO IN RCA INPUTS BROKEN #27036Regarding soldering (and de-soldering) I recommend researching that. I like to use a 60/40 (tin/lead) with a no-clean resin core. An important thing is making sure you don’t damage the older PCB traces with too much heat (both while de-soldering and soldering). So practice that well before taking on the real task.
I don’t know about replacing the RCA plugs. I don’t use them.
For one thing, the Beomaster 5500 is part of a B&O system. Every component is integrated and controllable by remote control via the Beomaster 5500. You get that using the 7-pin DIN interconnect cables which have the audio signal and remote control signal. Using the RCA connections are just for convenience with a non-B&O audio component and you lose the remote control functionality.
That is probably why the RCA plugs on most Beomaster units are not that great.
Stick with the B&O cables with the DIN plugs. You will enjoy the Beomaster 5500 a lot more if you use it as part of the Beosystem 5500.-sonavor
December 4, 2023 at 2:17 am in reply to: BEOMASTER 5500 RECEIVER – PHONO IN RCA INPUTS BROKEN #26956Hi,
This thread I did recently shows the disassembly and reassembly of a Beomaster 5500 receiver. I removed all of the boards for cleaning and restoration.
The link starts with the last post (reassembly) but if you scroll down to earlier posts you will see the disassembly post.Also, if you don’t have the service manual for the Beomaster 5500 I recommend picking one up. I believe there is at least one for sale on ebay right now.
Hope that helps.
-sonavor
You will need to fix the arm lowering where it is straight (up and down) before dealing with the tracking.
The arm positioning is also something that I have seen out of alignment.
Interestingly, I have come across several Beogram 400x turntables that have only had one owner. Those were all still in perfect mechanical alignment.
The distance between the tonearm and the stationary (fixed) arm needs to be 7.7 mm.
The tonearm cannot be moved so it is the stationary arm that has to be adjusted if there is an alignment problem that requires an arm re-positioning.The tonearm assembly does have a couple of mechanical adjustments that can mess with the arm lowering negatively. One is the horizontal bar from the back of the tonearm to the stationary arm. That is the bar with the “V” slot the arm lowering lever rests in.
I make sure that is aligned with the arm is raised and the lowering lever in the slot.
Manually moving the lever that the arm lowering solenoid drives to let the arm drop needs to result in the lever lifting straight out of the “V” slot and staying directly above the “V” (not to the right or left of it).
Typically though, I have found that horizontal bar with the “V” slot is okay.More often it is a problem with the positioning of the tonearm counter-weight.
There is a very narrow window the counter-weight can be adjusted to (toward the front or towards the back).
If sticking out too far in the back, the cover for the tonearm assembly will not fit.
If the counter-weight is too close to the back of the tonearm, it will interfere with the lowering.To summarize…
Make sure the stationary arm is parallel with the tonearm and the distance between them is 7.7 mm.
If that is not the case, make the necessary adjustments to the stationary arm position.
It has to be perpendicular to the back guide rail of the tangential arm assembly as well as 7.7 mm (and parallel) to the tonearm.
The service manual shows how to adjust that.
Next, check the tonearm counter-weight position.
Last, make sure the horizontal “V” and arm lowering lever align.Do all of those alignment and adjustments with the tonearm cover removed.
Get everything aligned and working with the tonearm cover off first.These adjustments take patience. There have been a couple I worked on where I started wondering if they actually could be realigned or not. In the end, they always can.
-sonavor
Assuming that your Beogram is already electronically restored correctly and that the tracking sensor components are working (lamp and sensor), I would suspect the problem to be a misalignment of the mechanics involved.
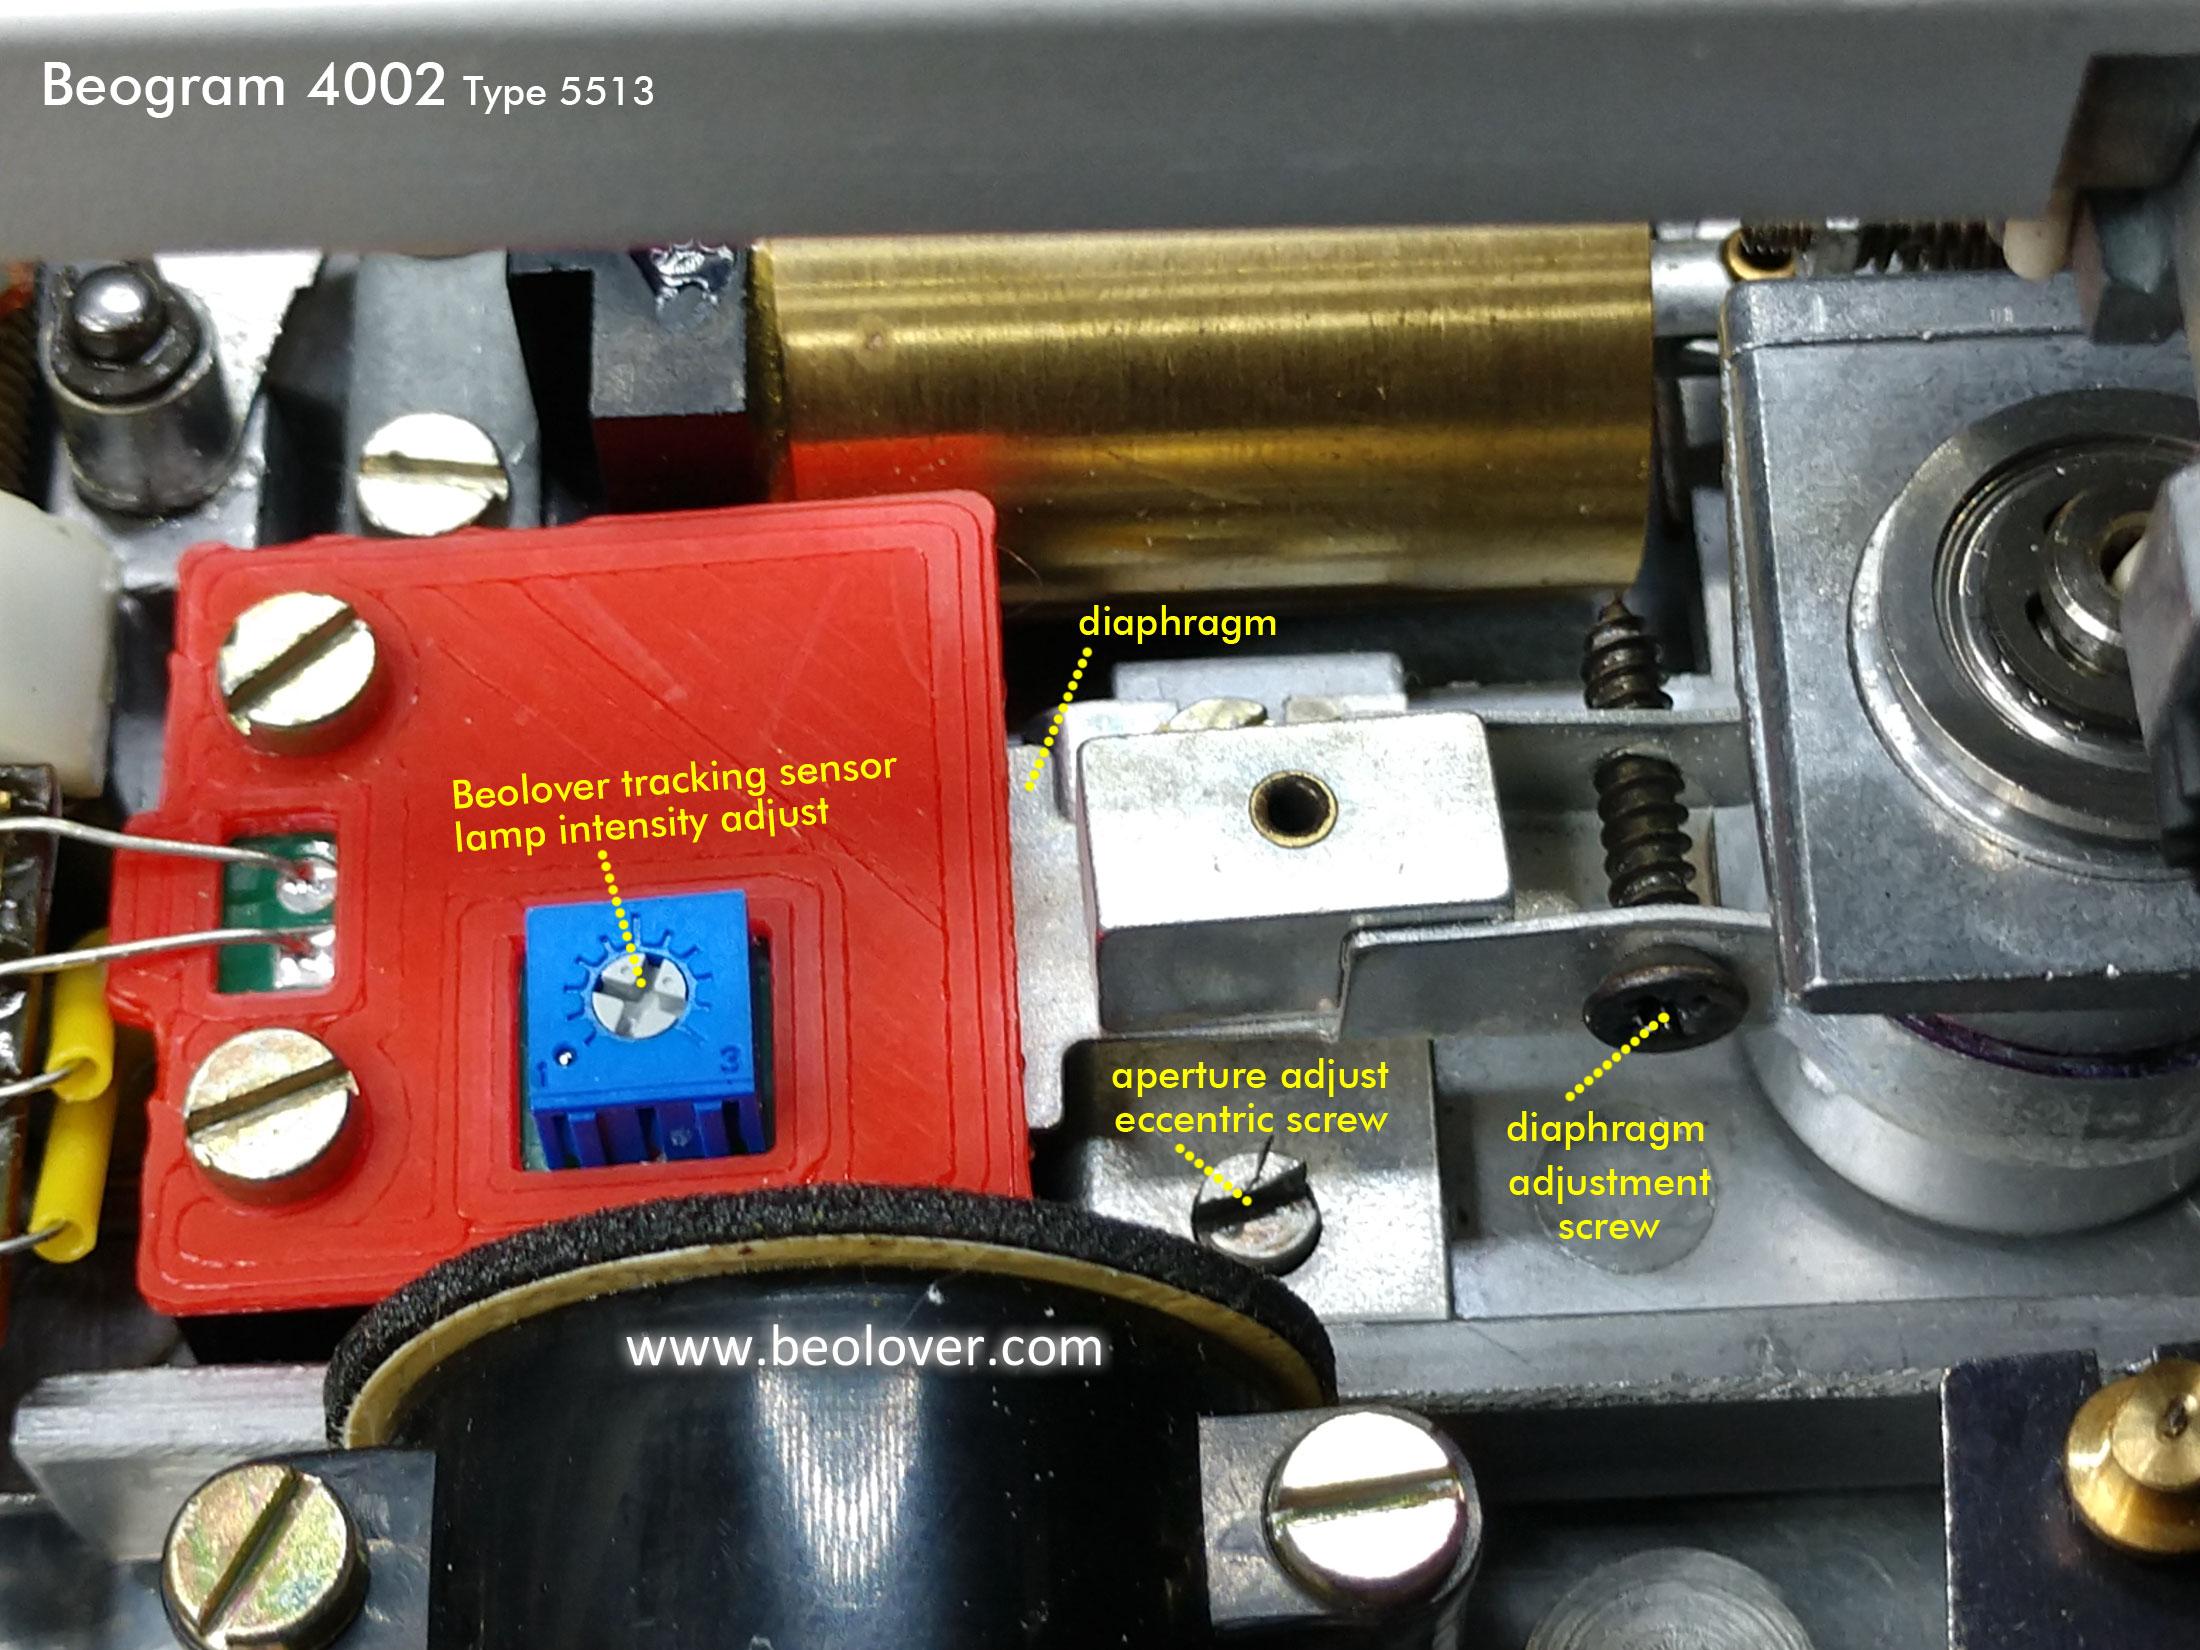
This is a photo I created a while back that shows the mechanical components involved.

Notice the large screw that secures the diaphragm assembly to the base of the tonearm pivot.
That adjustment can get out of position while a Beogram is being worked on and realigning it can be a bit tricky.That assembly bracket can rotate around the tonearm pivot as well as move up and down.
The up and down movement adjusts the height of the diaphram to the sensor housing.
The service manual says that distance should be 1 mm.The left/right rotation of the bracket adjusts the range of the diaphram’s movement across the sensor lamp.
If that position is too far one way or another, the tracking sensor will not work.What I do in this case is try and center everything to return to an initial factory position.
So the diaphram is set above the sensor housing by 1 mm.
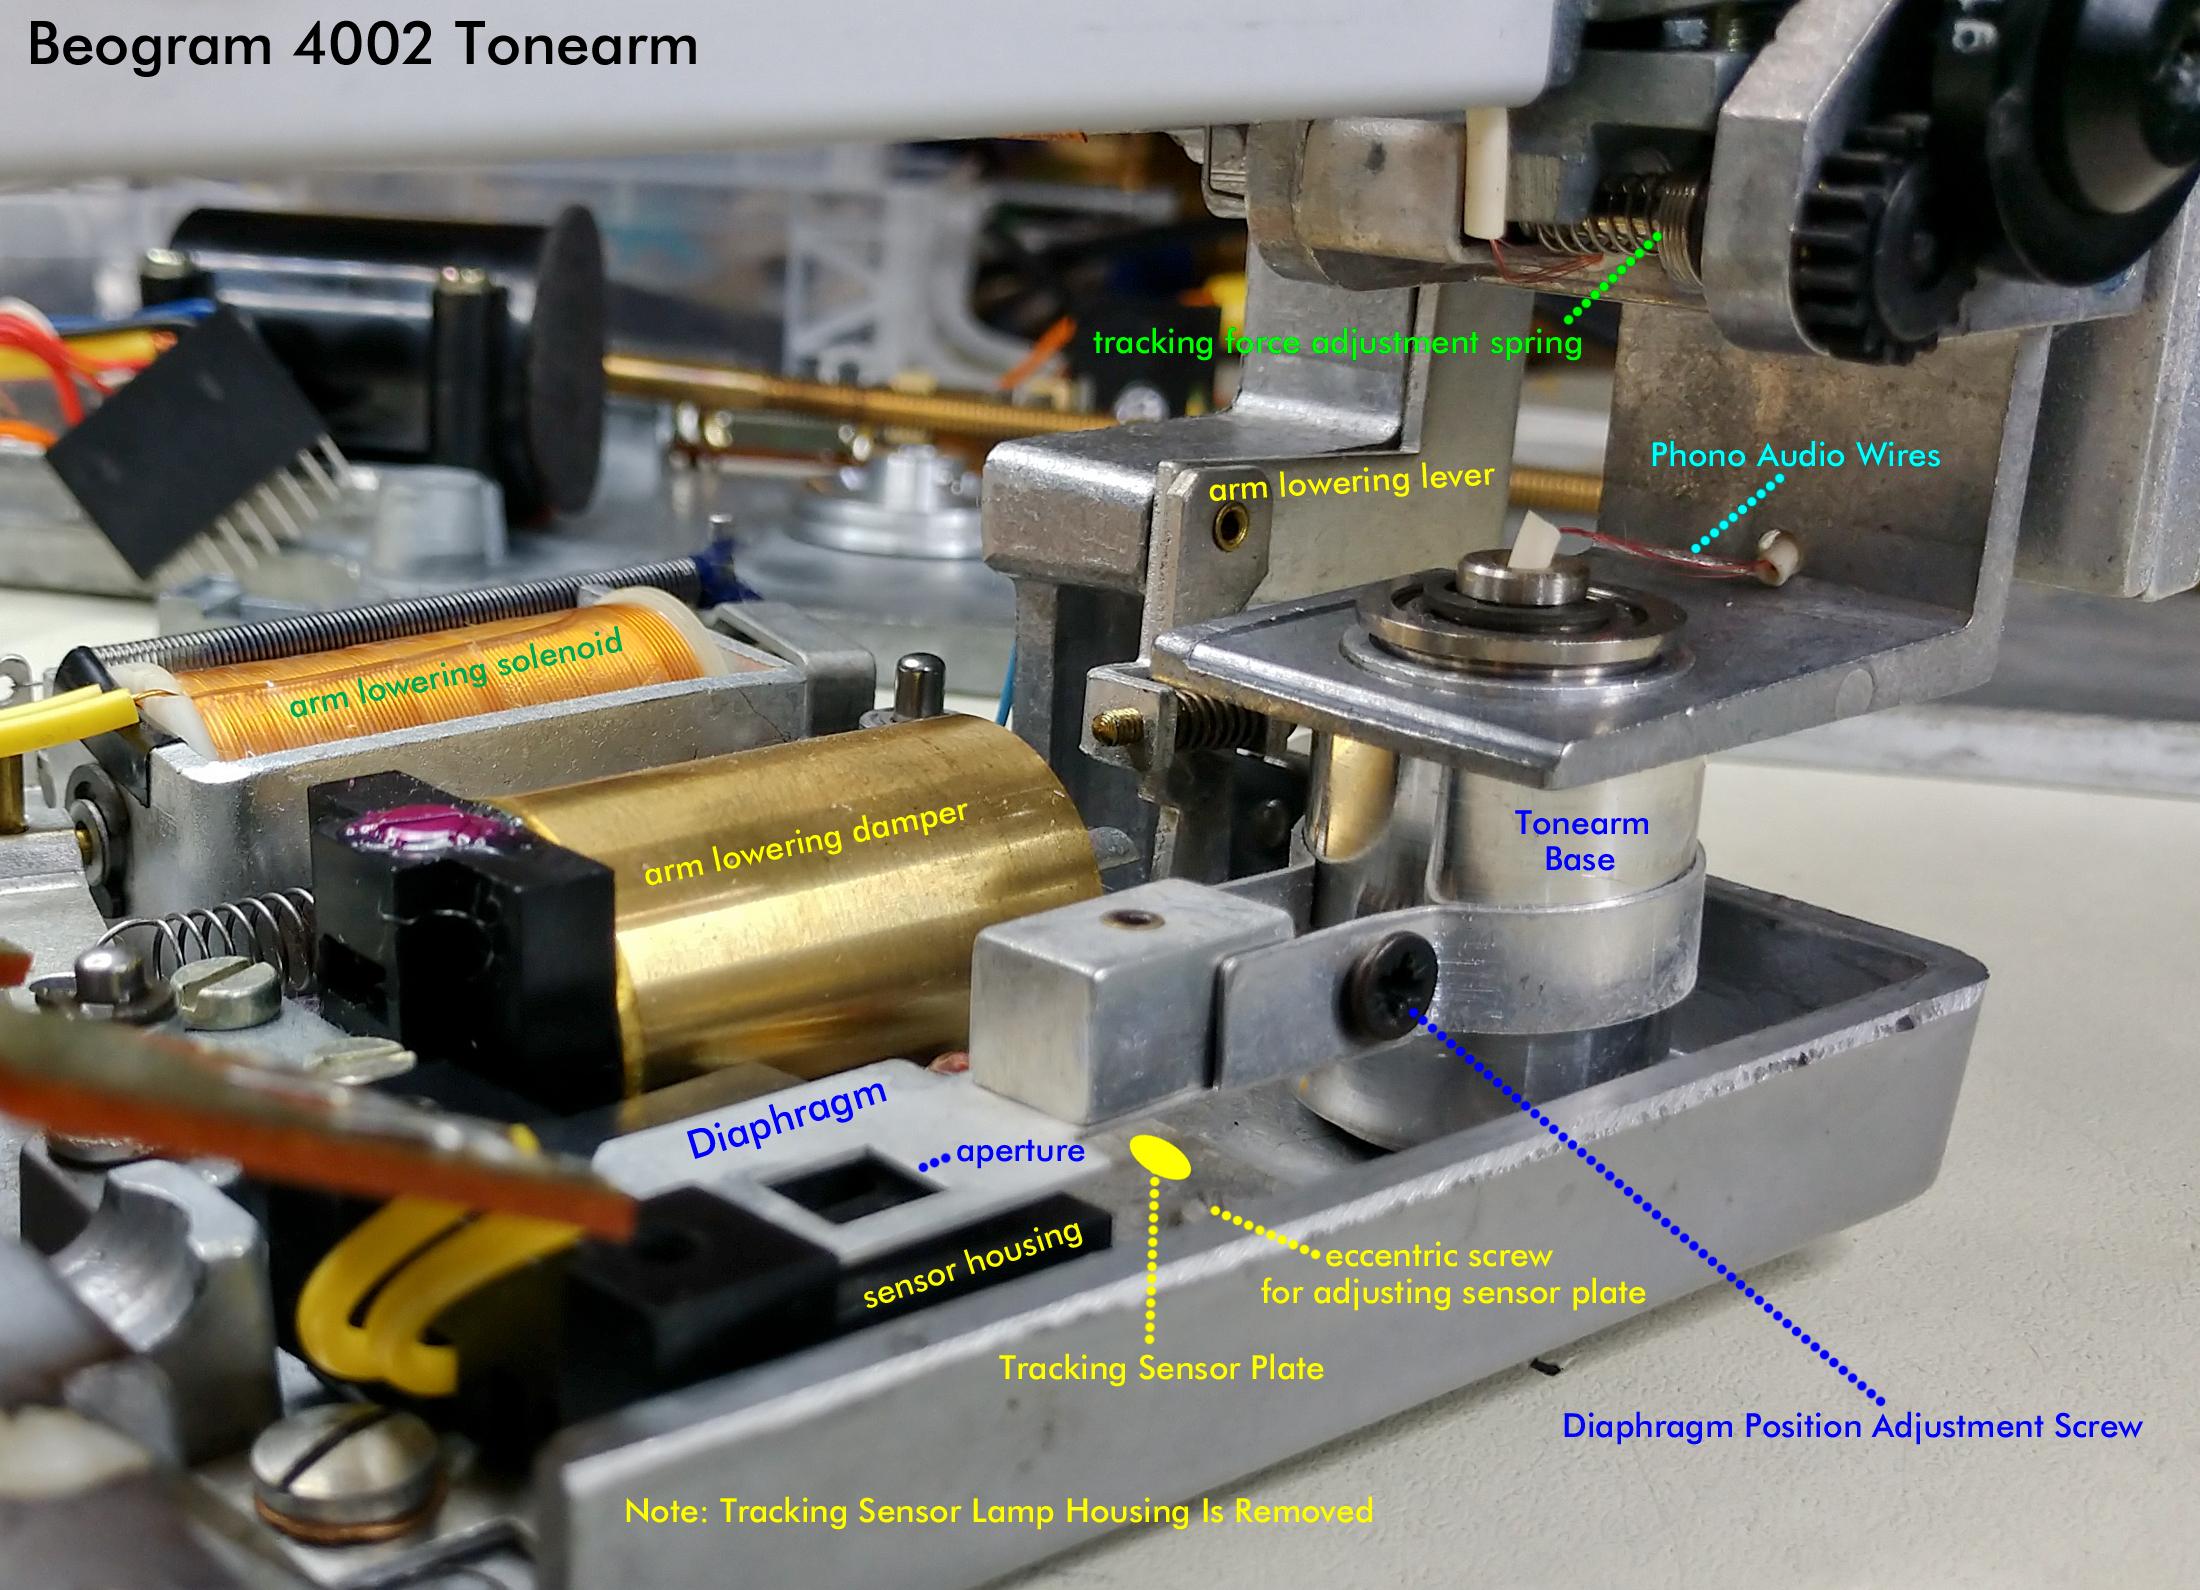
The diaphram slot is set to be centered over the sensor housing and the eccentric adjustment screw is set to be centered (so it can be adjusted in either direction later).Getting that initial starting point can take several tries.
I like to get my starting point set where the tracking sensor is already close to being correct just by my setting of the diaphram position.Once I am that close, I can finish the tracking adjustment per the service manual by using the eccentric screw.
Here is another photo of the mechanical parts. This time with the lamp housing removed.

You have to be patient to get this set right.
After making a change to the position of the diaphram assembly you have to gently tighten the adjustment screws then perform a tracking test.
I just do a crude tracking test with the platter removed and an old cartridge installed in the tonearm.
I move the arm into play position and let the arm drop into “play” position.
It needs to lower straight down and stay in place with no forward movement.
Then you can gently nudge the cartridge towards the center of the record and observe if the tracking sensor detects the movement…and drives the servo to adjust.Like I said to get to that point can take a lot of tries. It also takes quite a bit of patience to tighten the final position back up when you finally have it, without accidentally moving the diaphram. That is easier said than done I am afraid. But you should only have to do this procedure one time. After that any fine tuning can be done with the eccentric screw adjustment. That is why it is important to have that centered to begin with so there is room for adjustment.
Hope that helps and good luck.
-sonavor
hi traverso,
IL1 or the LDR devices inside the volume control (8002293) could be the problem.
Take the cover off the volume control and see if the lamp illuminates.Did you also check the contacts on the Balance control slider?
-sonavor
Per auric “I don’t think it will function vertically. There’s nothing to hold the platter or the LP in place.”
Not only the platter, sub-platter and bearing would have nothing to hold them in place…but also the tonearm with cartridge uses gravity to allow the arm to lower. Vertically it would do nothing.
-sonavor
If you unbolted the main PCB from the cabinet for the capacitor replacement, did you keep the FM tuner (metal box) secure? If the metal box was free to move while you were working it is possible a shield wire became disconnected…introducing the hum.
-sonavor
July 26, 2023 at 6:17 pm in reply to: Beogram 4002 Tonearm Sets Down at End of Platter With No Record #22493Hi John,
Examine the position sensor slide scale. You might have to remove it to see what is going on. Either way, see what the second switch (that the slide scale engages…the ES switch) looks like. I have seen a couple cases where the scale moves beyond where it was intended to travel, then bends the ES switch the wrong way (often breaking it). With a non-functioning ES switch, the tangential arm assembly will keep trying to move left. When playing a record the Beogram 4002 sensor for the out groove should trigger a stop and return but when advancing with the tonearm up, the ES switch must engage.
If you can see that the ES switch is intact, try operating it manually with the slide scale removed.
-sonavor
Yes, there is one emitter and two receiver/sensors.
They are shown on the service manual schematic (1-2).You should be able to see the activity on an oscilloscope.
However, since you don’t clear the SO switch I would suspect a problem with the control for the Servo motor. You mentioned that you found quite a few bad wires already.
I suggest you start looking at Motor Control part of the schematic.
Also check the “>>” and “<<” LDR adjustment per the service manual.
Their steady state adjustment affects the Servo Motor control.-sonavor
The Beogram 800x turntables rely on the position sensors that the spindle pulley assembly passes across. When you press Play the Beogram circuity drives the spindle forward until the mechanical SO switch disengages. At that point the Beogram uC begins counting the position sensor generated pulses to keep track of where the arm is.
It sounds like your position sensor assembly is either failed or the path from the sensors to the circuitry on PCB1 and PCB2 is broken.
-sonavor
While we definitely come across plenty of failed, original components (due to age and whatever ordeals they have suffered), the number one cause of faults is still a broken connection. Either a bad solder joint, a broken trace/pad or a faulty connector pin.
Those are often pretty difficult to find…so nice work in solving the problem.
-sonavor
Hi,
The originals were foam type surrounds.
How noticeable the difference is will be purely dependent on the listener.If you are trying to keep things to the original design then stick with foam surrounds.
It would be interesting if you were to do one with foam surrounds and the other with rubber, then see if you can tell a difference.
Those are pretty easy drivers to replace surrounds on so it wouldn’t be difficult to try.
Plus, those being small drivers, the surrounds don’t cost much.If you do the test be your and post about it here.
-sonavor
I tried your “easy” motor opening method and it worked great. No more Dremel and debris from the cutting. Best tip I’ve received in a while. Thanks again.

-sonavor
Is that encoder tool something you made or is it something that can be bought? If the latter, can you post a link for it?
Thanks,
sonavorThat is great information. I’m so glad you discovered a way around using a Dremel. That will save a bunch of time and effort.
Can you go into detail of what you did for your performance measurements?
Thanks,
sonavorMy suggestion for anyone collecting these vintage Beocord units is to begin the restoration with new belts from Beoparts, use the restored Beocord decks, then do a service check from time to time. That will catch any belt deterioration before a real problem.
As mentioned earlier in this thread, it would be an excellent idea to remove the belts whenever the Beocord was put into storage.On interesting thing is on the rubber wheels in the Beocord units. I don’t believe I have ever encountered any of those turning into goo. I do always replace the rubber wheels during a Beocord restoration but I haven’t ever had to clean off sticky residue left by any of those.
-sonavor
I think the use it or lose theory fits here.
Thanks for digging into the problem more.
-sonavor
The transformation into the black goo is an interesting one. I believe that happens due to the way the Beocord unit was stored. I think a belt will wear to the point of requiring replacement during regular use inside a normal, home environment.
I also believe the belts that deteriorated into goo happened because so many owners stopped using cassette decks (I know I did for quite a while) and put them into storage like attics, basements and storage sheds. Those environments resulted in the deterioration of the rubber. That is just my guess of course but I don’t think a belt will deteriorate to that extent if the Beocord remains in use and is maintained (service checks).
-sonavor
All rubber belts will eventually wear out. How quickly is determined by their use and operating environment. The most important thing is to have faithful reproductions of the original belts which is what Martin produces.
-sonavor
- AuthorPosts
