Glitch
Forum Replies Created
- AuthorPosts
-
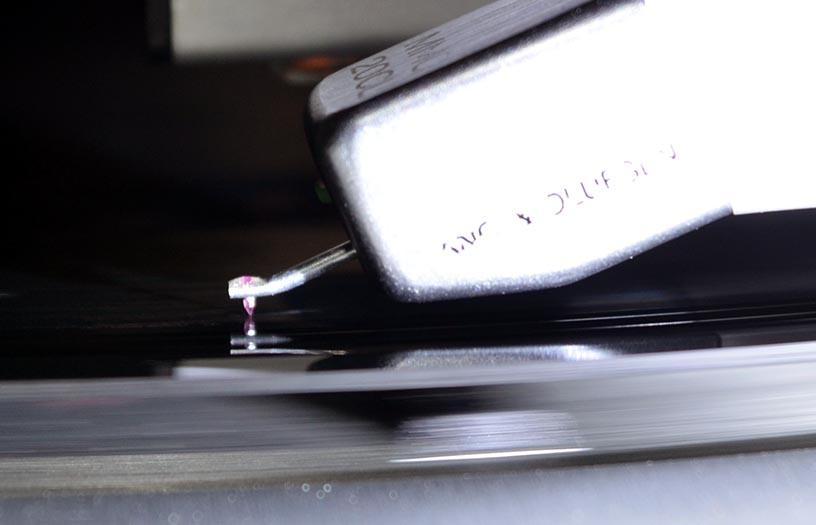
The latest experiment was to make several cantilevers with different tracking angles. The picture above is the one that, by eye, has the best geometry. The bad news is that all of the candidates exhibit a very similar distortion. The good news is that my cantilever bending jig seems to work and I found a record track where the distortion is easy to hear (i.e. the issue is easily repeatable).
Please let me know if you are interested in hearing a recording of the distortion, would like to see any other views of the cartridges, or have any suggestions of what to try next. Thanks.
Glitch
Is it a bad standby transformer ?
Most likely. The transformer could be shorted internally. I believe the best way to check this is to pull the transformer off the circuit board and check to see if each of the primary coils is independent from the other.
Glitch
Derek: Thank you for posting the video. I was able to pick up at least one tip as well as confirm that some of the methods that I already figured out are on the right track.
Martin: Yes, the tracking angles in the first picture are pretty unsatisfactory, especially the FMMC2. The FMMC20 isn’t nearly as bad. I didn’t do a good job at lining up the cartridges for the picture. For the first attempts, I didn’t try any adjustments to the geometry. I was just happy to complete the transplant without destroying either the replacement cantilever or broken cartridge. 😉
Here are today’s results that include adjusting the tracking angle and better cartridge alignment for the picture.
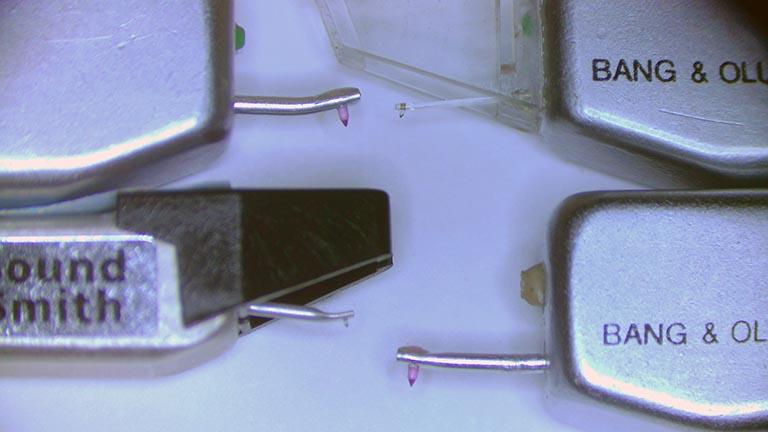
The tracking angle in the top left was purposefully altered. The bend in the bottom right is a result of damage from the reaming process in one of my earlier attempts. I’ve learned that it is pretty easy to damage the components while working on them.
One advantage to Matador’s approach is that it should be easier to adjust the tracking angle simply by bending the inner wire.
Glitch
I’ve run some similar experiments using the same dirt cheap replacement cantilever/stylus…
My approach is a bit different than matador’s. Instead of using an “internal” wire to connect the new cantilever to the old cross, I reamed out the new cantilever to fit over the collar on the cross. This (theoretically) has a performance advantage of only having one interface connection (i.e. where glue is needed) instead of two.
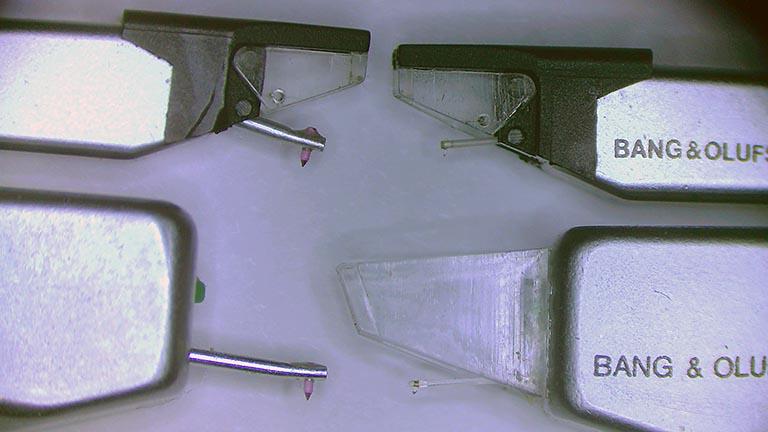
The picture above shows a couple examples of the FrankenCartridges compared to the original.
The FrankenCartridges track a record groove just fine and make music. I’ve noticed some distortion in the high frequencies. My initial thought was that this was caused by a bad suspension in the donor cartridge. I’ve since repeated the experiment on a few other cartridges to try to identify a pattern. My sample size is admittedly small, but the two “best sounding” cartridges that have nearly identical distortion. I also have cartridges where it is obvious that the suspensions are shot. Based on this, I’m guessing that the distortion is caused by bad tip geometry, bad interface connection (currently just using a friction fit), or that the new pink styli are simply crap. I’m not ruling out all three ;-). Does anyone have any theories?
I’m not sure what I’ll try next. Has anyone tried this with a better quality replacement cantilever/stylus?
Glitch
Is it really £45? I think better in €/$ so I’ll switch to that currency.
- €57 – Beogram 2000
- ? – Shipping for the above Beogram 2000
- €56 – beoparts-shop order (belts, cap kit, muting relay, other rubber parts that are dried up)
- * €75 – Used MMCx cartridge from eBay that doesn’t work at all. Advertised as “not able to test”
- * €150 – Another used MMCx cartridge from eBay that plays distorted. Advertised as “working, looks nice”.
- €230 + shipping – Soundsmith SMMC4 (that plays wonderfully)
* – optional steps
So the actual price is higher depending on your exposure to the Beovirus.
Is it worth it?… Of course! 😉
Glitch
One could always just listen to the recording on Spotify (or equivalent) while looking at the physical albums. 😉
Glitch
I’m not sure I’d buy that he sold it for $3K as it was never sold in mint condition.
$3K does seem to be on the very high side for a BG4002. I actually tried to verify the statement by looking at the eBay sold history, but didn’t find anything one way or the other. Based on some other outrageous prices being paid for similar items, the claim isn’t entirely unbelievable. My original observation wasn’t so much about the price as the seller’s apparent willingness to accurately describe the current condition of the machine and provide some history. This information will undoubtedly decrease the final selling price of the machine.
You can clearly see in the video the wear spots on the control panel
If you look at picture 2/9, the panel looks very good. Many sellers would have only shown that picture.
If he knew what he was doing he could balance and center the platter plus clean the top plate.
I didn’t get the impression that he was trying to pass the machine off as being in great condition or being worked on by a “professional”. In many other eBay descriptions, there are references to the machine being “recently serviced”, or similar vague wording, which “technically” could be describing exactly (and misleadingly) what this seller did.
Am I right in guessing that there’s muffler tape on the tonearm?
To me, it looks like the tone and sensor arms were sanded and polished, presumably to remove scratches/gouges.
I really don’t expect the machine to sell for much money. Even things like the “local pickup only” are working against the price.
However, I predict that whoever buys it won’t be disappointed. I assume it will be someone looking for a specific part. The description should be pretty helpful for understanding if that part will be functional compared to the ads that simply say “working” or “unable to test”.
In hindsight, my comments are as much about as what the seller didn’t say as what he did say. 😉
Glitch
I agree that the tip of the stylus doesn’t look quite right (but is hard to tell from the pictures). You might want to try cleaning it in case it just has crud build up. There are many ways to clean a stylus (some good, others not so much). I usually start with a dry 5/0 artist brush and only progress to something more aggressive if needed.
After cleaning, reevaluate the condition of the tip. Search online for macro photos of styli for a comparison.
Martin: In the first picture, is the cantilever skewing to the left an indication of a failing suspension?
Glitch
That was painful to watch.
Just curious… How many hours do you think that it would take you to repair just the “damage” that he caused during the filming of the video? (i.e. fix the cartridge contacts from the sandpaper damage, etc.)
Glitch
Is this a symptom of a trashed cartridge?
Possibly. Can you post some pictures of the cartridge? (especially the cantilever from the front, top and side)
Glitch
January 19, 2024 at 4:32 pm in reply to: Stored/Unused B&O Equipment – Potential Deterioration of Components #28821You might want to reconsider storing equipment in an attic depending on the temperatures that occur in your particular attic. I know that my attic gets above 120 Fahrenheit / 50 Celsius in the summertime. IMHO, this is too hot for storing equipment. I store my excess equipment either in my cool, dry basement or on semi-permanent loan to family and friends.
I’ve considered removing belts from the tape decks for long term storage. This may save the step of cleaning up the “goo” if the belt degrades that far.
For the lithium batteries… Whenever I replace the soldered-in batteries, I install a socket. This would make it easy to remove/replace the battery if needed.
As far as the equipment use affecting battery life, I think that it is dependent on the specific design. I’ve seen some designs where the battery powers the memory backup regardless of the power status of the equipment.
I’m also curious about people’s opinions about the “use it or lose it” when it comes to capacitors. I’ve read contradicting things on this subject (i.e. the subjective versus objective problem).
Glitch
Thank you Lee and Keith for making Beoworld the invaluable resource that it is.
Thanks also to anyone else that made Beoworld such a special place. It may have been through supporting the site with sponsorship, by other financial means, or by providing useful content and camaraderie.
Beoworld certainly makes owning vintage B&O equipment much more enjoyable.
I wish you the best of luck in selling the website. It would be a shame for this treasure trove of information to be lost. If a new owner can’t be found, is there a possibility of archiving the “entire” website somewhere? Something like the “Wayback Machine” (but without all of the broken links).
Glitch
A multimeter reading does indeed show negative polarity (the DC output voltage on the old unit is now indicating 19-volts, hence the need for the new 12v DC power supply).
You might not need a new power supply. If the power supply is unregulated, it will read “high” if there is not a load applied. You might want to take the multimeter reading again with the either the device connected to the power supply or a dummy load that simulates the device load.
Glitch
I now am able to present the lid after a polishing treatment.
It looks like you made a significant improvement!
I can still see scratches, but I am not sure, if they are on the surface (I cannot feel them), or maybe on the inside, or, third possibility, in the glass itself.
What you are seeing is most likely on the outer surface. The scratches might be ones that you originally didn’t notice or could be ones that you added as part of the sanding process. Being methodical with your sanding technique can help with identification. For instance, if you sanded “up and down” with the 1000 grit and “side to side” with the 2000 grit, the direction of the scratches gives a clue of where they came from. Scratches that are not up/down or side/side are probably original. The scratches left by a random orbit sander have a distinctive pattern and are easy to identify.
The other “problem” is that, with practice, you get better at finding and noticing the scratches. It is a curse. 😉
I will give this practice lid another try, starting from scratch.
That is a good plan. Doing so should also help you answer your own scratch questions definitively.
What would be interesting for me is, how much time it takes you for finishing such a work? How long do you need, e. g., for sanding in 4 steps, or for the machine polishing?
It all depends on the particular dust cover and how bad it was at the start. For example, I spent 4 to 5 hours on the BG8002 cover above before I took the pictures. I spent another 1.5 to 2 hours on it then next day to clean up the remaining scratches. Yesterday, I polished a Beogram 5500 cover (smaller, simpler shape) that started in better condition. This took about 2 hours total. Both of these jobs were done entirely with a random orbit sander.
Glitch
I bought my speakers used and the steel wasn’t in the best shape with scratches and even some rust spots.
Yep, pristine Pentas are increasingly rare. Mine have their share of scratches and dents. I’ve considered sanding the stainless to a matte/brushed finish. This would make the flaws less noticeable.
There is also the option of painting. I’ve painted the plastic trim and bases (but not the stainless). One thing that I like about the paint is that it makes the speaker look more cohesive by not having so many different colors (shades of gray) and textures.
Painting the stainless seems blasphemous. It reminds me of a painted Delorean (the car). It may (arguably) look better, but is just isn’t a Delorean. 😉
Glitch
Looking good! It appears that you have found a pretty good match with the original fabric.
The fingerprints on the stainless is part of the charm of owning Pentas (at least that I what I keep telling myself 😉 ). I’ve tried many different things with varying degrees of success. I’ve settled on just wiping them down with isopropyl alcohol once they are installed in their final location and try not to touch them.
Glitch
Assuming the transformer is correctly re-wired from 220V to 120V, is there anything else that would need to be rewired before the turntable can be plugged in using a simple plug adapter ?
I didn’t notice anything obvious. I’ve not done this myself so I can’t say 100% for sure.
I would NOT use a plug adapter. Cut off the EU plug and install a proper North American plug. You don’t want to get into the situation where the internal conversion to 110v is done and then the turntable is accidentally plugged into a 220v outlet. Bad things could happen from both a physical and liable standpoint.
Of course, following common sense and all local laws is heavily advised…
Glitch
What exactly you’d like to connect there?
I’m not exactly sure. It just “seems” like something that might be useful. 😉 Being able to bit-bang from a Raspberry Pi would likely cover anything that I would want to play with.
Each telegram contains a checksum. If a bit got flipped somehow (messages colliding etc) the checksum won’t match and the telegram is ignored or resent.
My question was related to how the retry strategy works. For example, which device (sender or receiver) initiates a retry? I’m not really looking for an answer here, but your statement of a “USB-serial chip that on the receiving side happily ignores any parity errors” got me thinking a bit. My experience is that 90% of code from most projects is (or should be) dedicated to faults and edge cases. This code is usually under-represented since 90% of the coders only want to work on the 10% of code that is NOT faults and edge cases. 😉
Glitch
I’m glad to hear that it worked out, but where are the pictures? 😉
Glitch
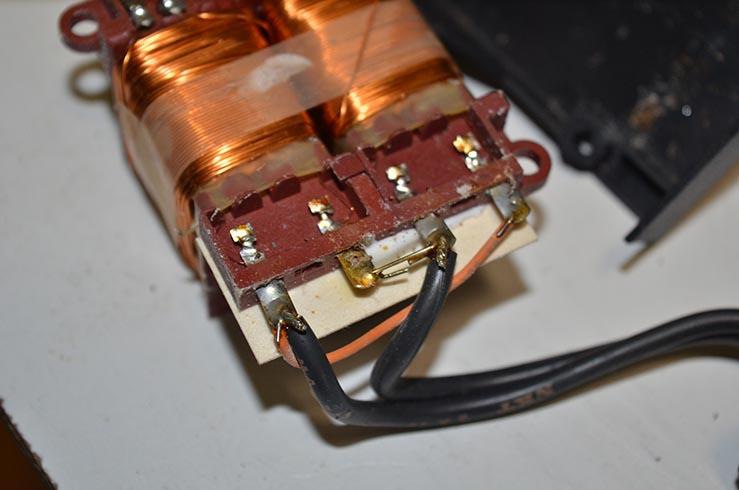
It is not obvious from the video since the connections are under the black transformer cover.
I happen to be working on a Beogram 5500, which has very similar, if not exactly the same, inner workings as the BG3500.
Here is a picture of the transformer connections
Here is the relevant part of the schematic
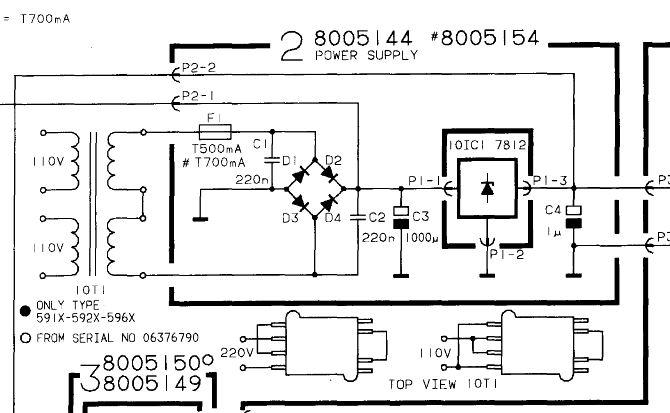
Notice the 110v and 220v connection diagrams at the bottom of the schematic. For reference, the transformer in my picture is wired for 110v.
Glitch
- AuthorPosts
