Beosound Ouverture CD not working
- This topic has 44 replies, 6 voices, and was last updated 11 months, 2 weeks ago by
Madskp.
- AuthorPosts
- February 1, 2024 at 8:52 pm #29304
Thanks both!
My other BC2300 (older two-way, curved laser model) arrived in the middle of a Bavarian winter and I think had been dropped in transit. Inside was a mess and I spent a great deal of time rebuilding the plastics inside. I posted about it here: https://archivedforum2.beoworld.co.uk/forums/p/189/148906.aspx#148906
This newer BC2300 plastic seems less brittle; I put PCB1/2 in the service position earlier today to give it a good clean inside, but when re-assembling those self-tapping screws that go into the plastic frame are always a worry!
I have included a couple of fresh belts in my Beoparts order, and a new CR2450 battery will arrive with the capacitors!
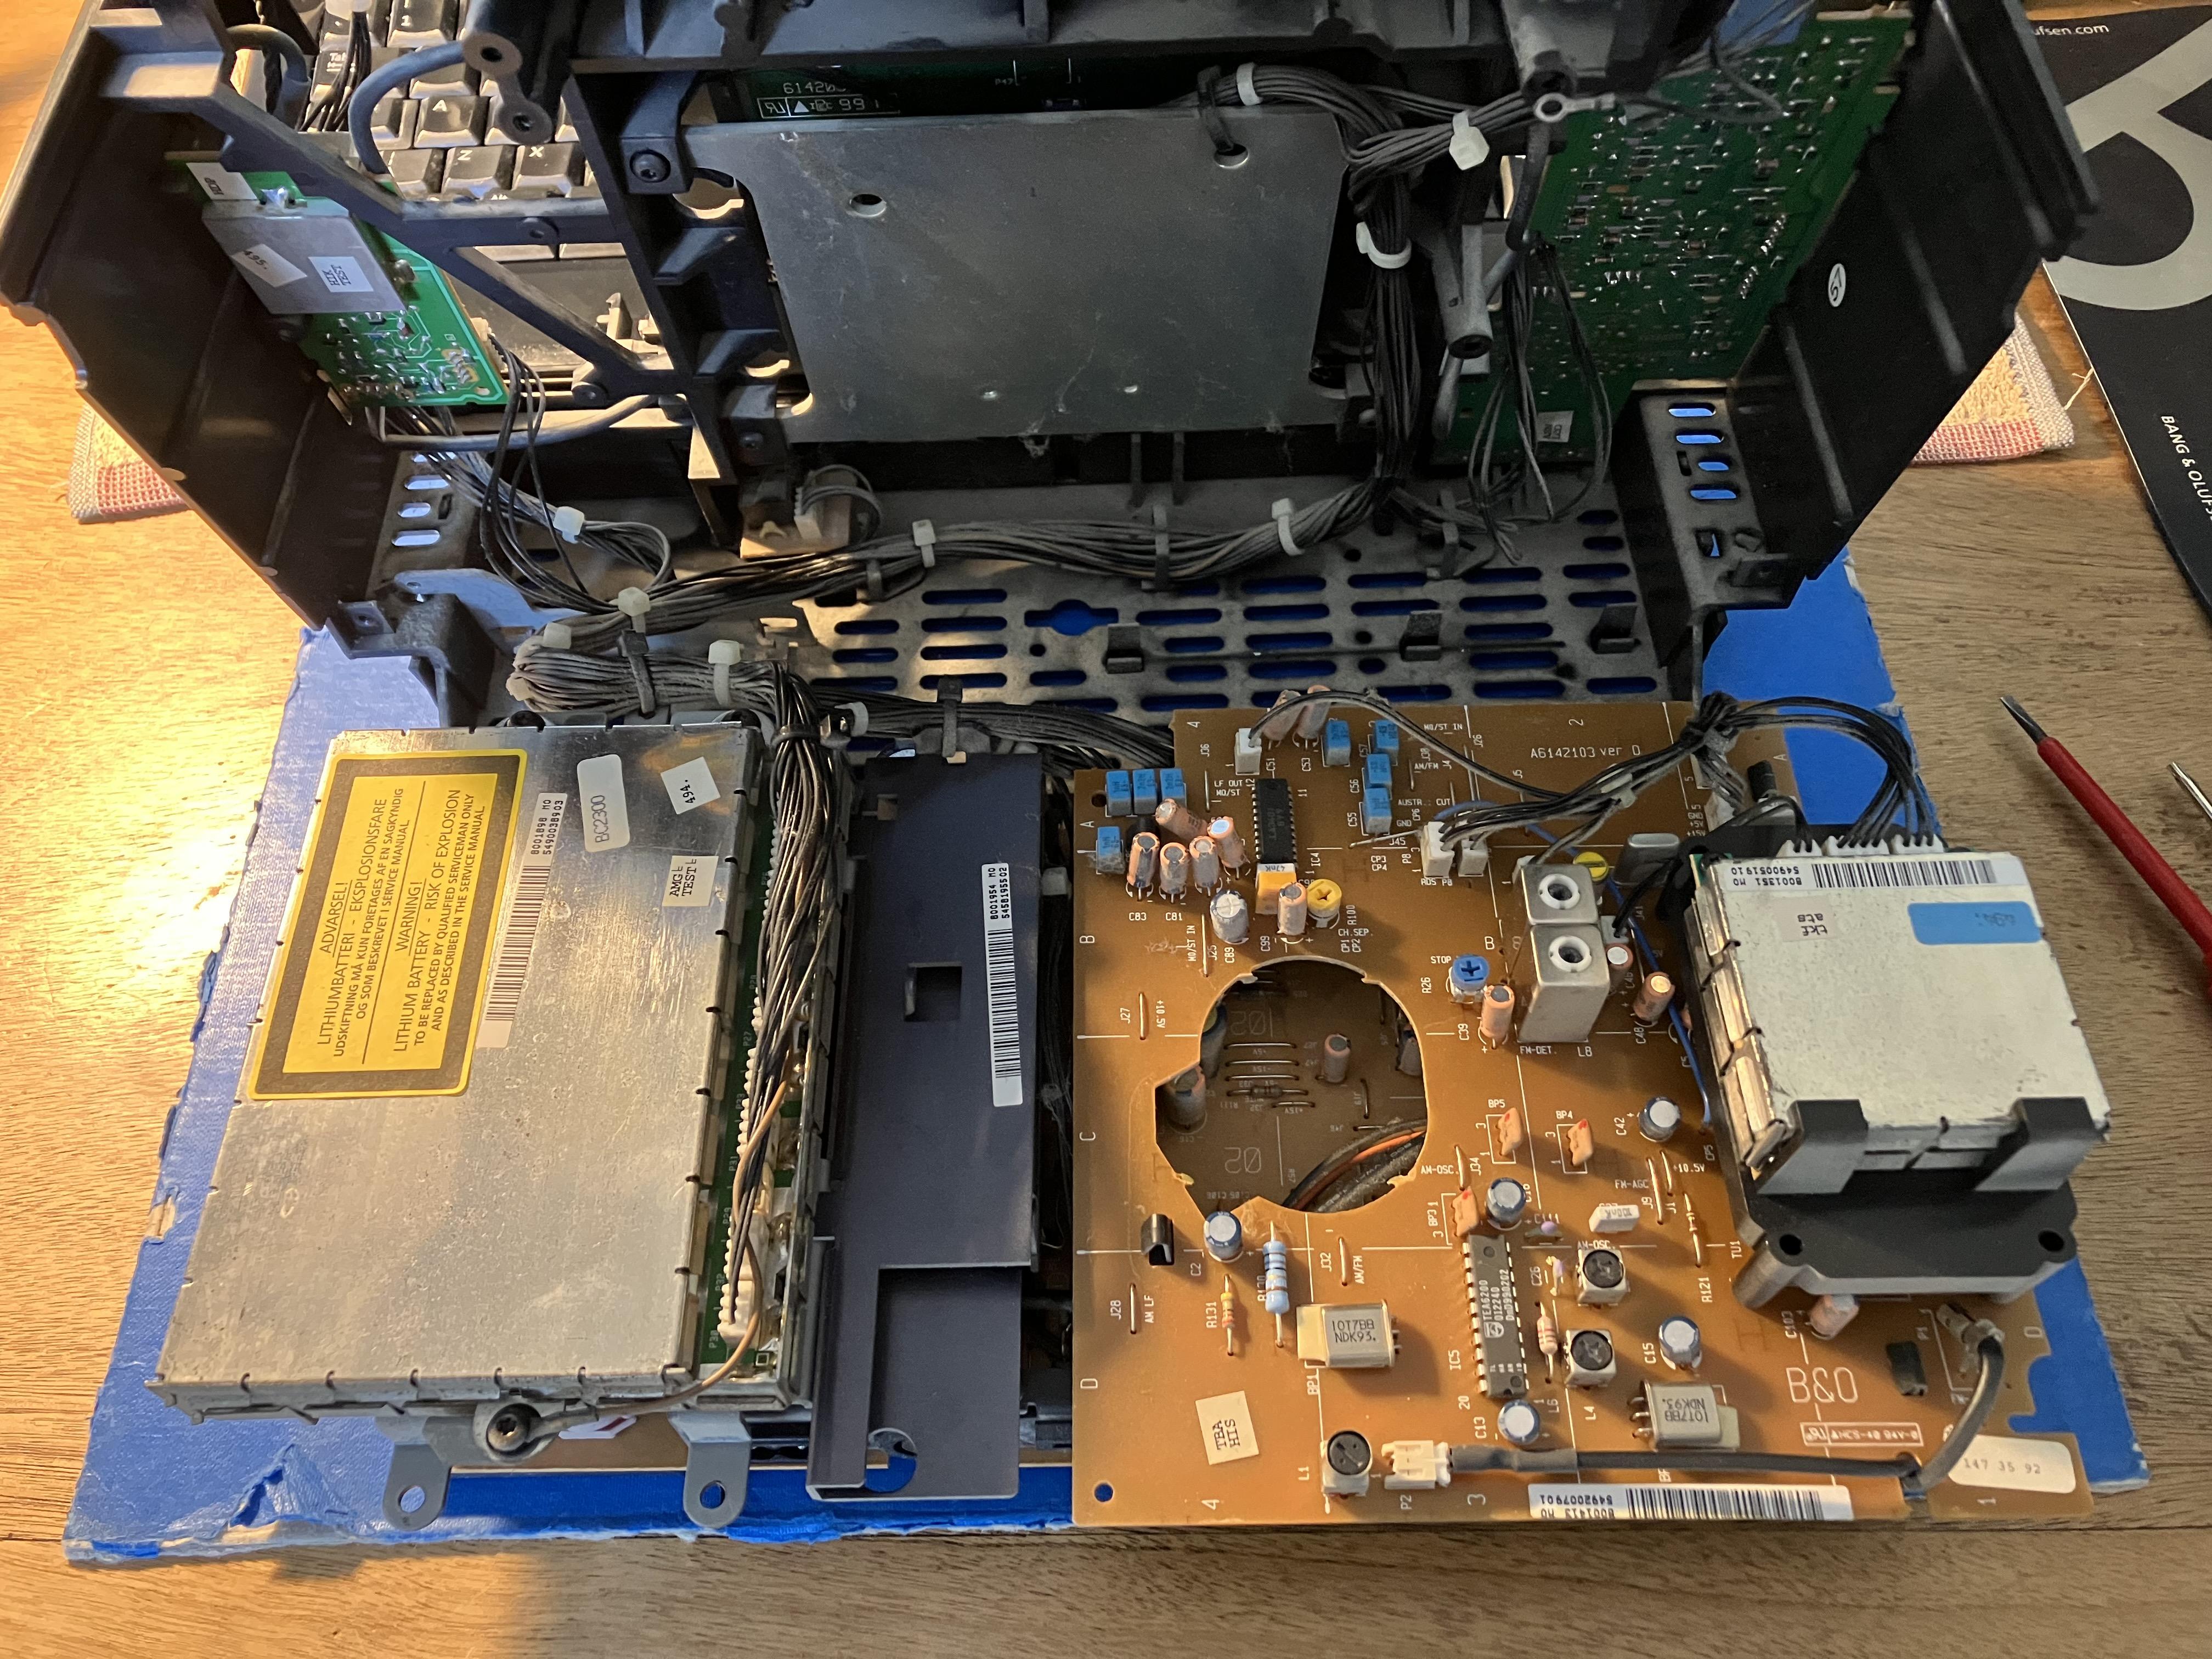
EDIT: Photo prior to start of cleaning with paint brush and vacuum cleaner:
 February 2, 2024 at 11:02 am #29313
and a new CR2450 battery will arrive with the capacitors!
Where is this CR2450 battery located? I don’t think I have noticed one while working on my Ouverture.
February 2, 2024 at 11:47 am #29315Where is this CR2450 battery located? I don’t think I have noticed one while working on my Ouverture.
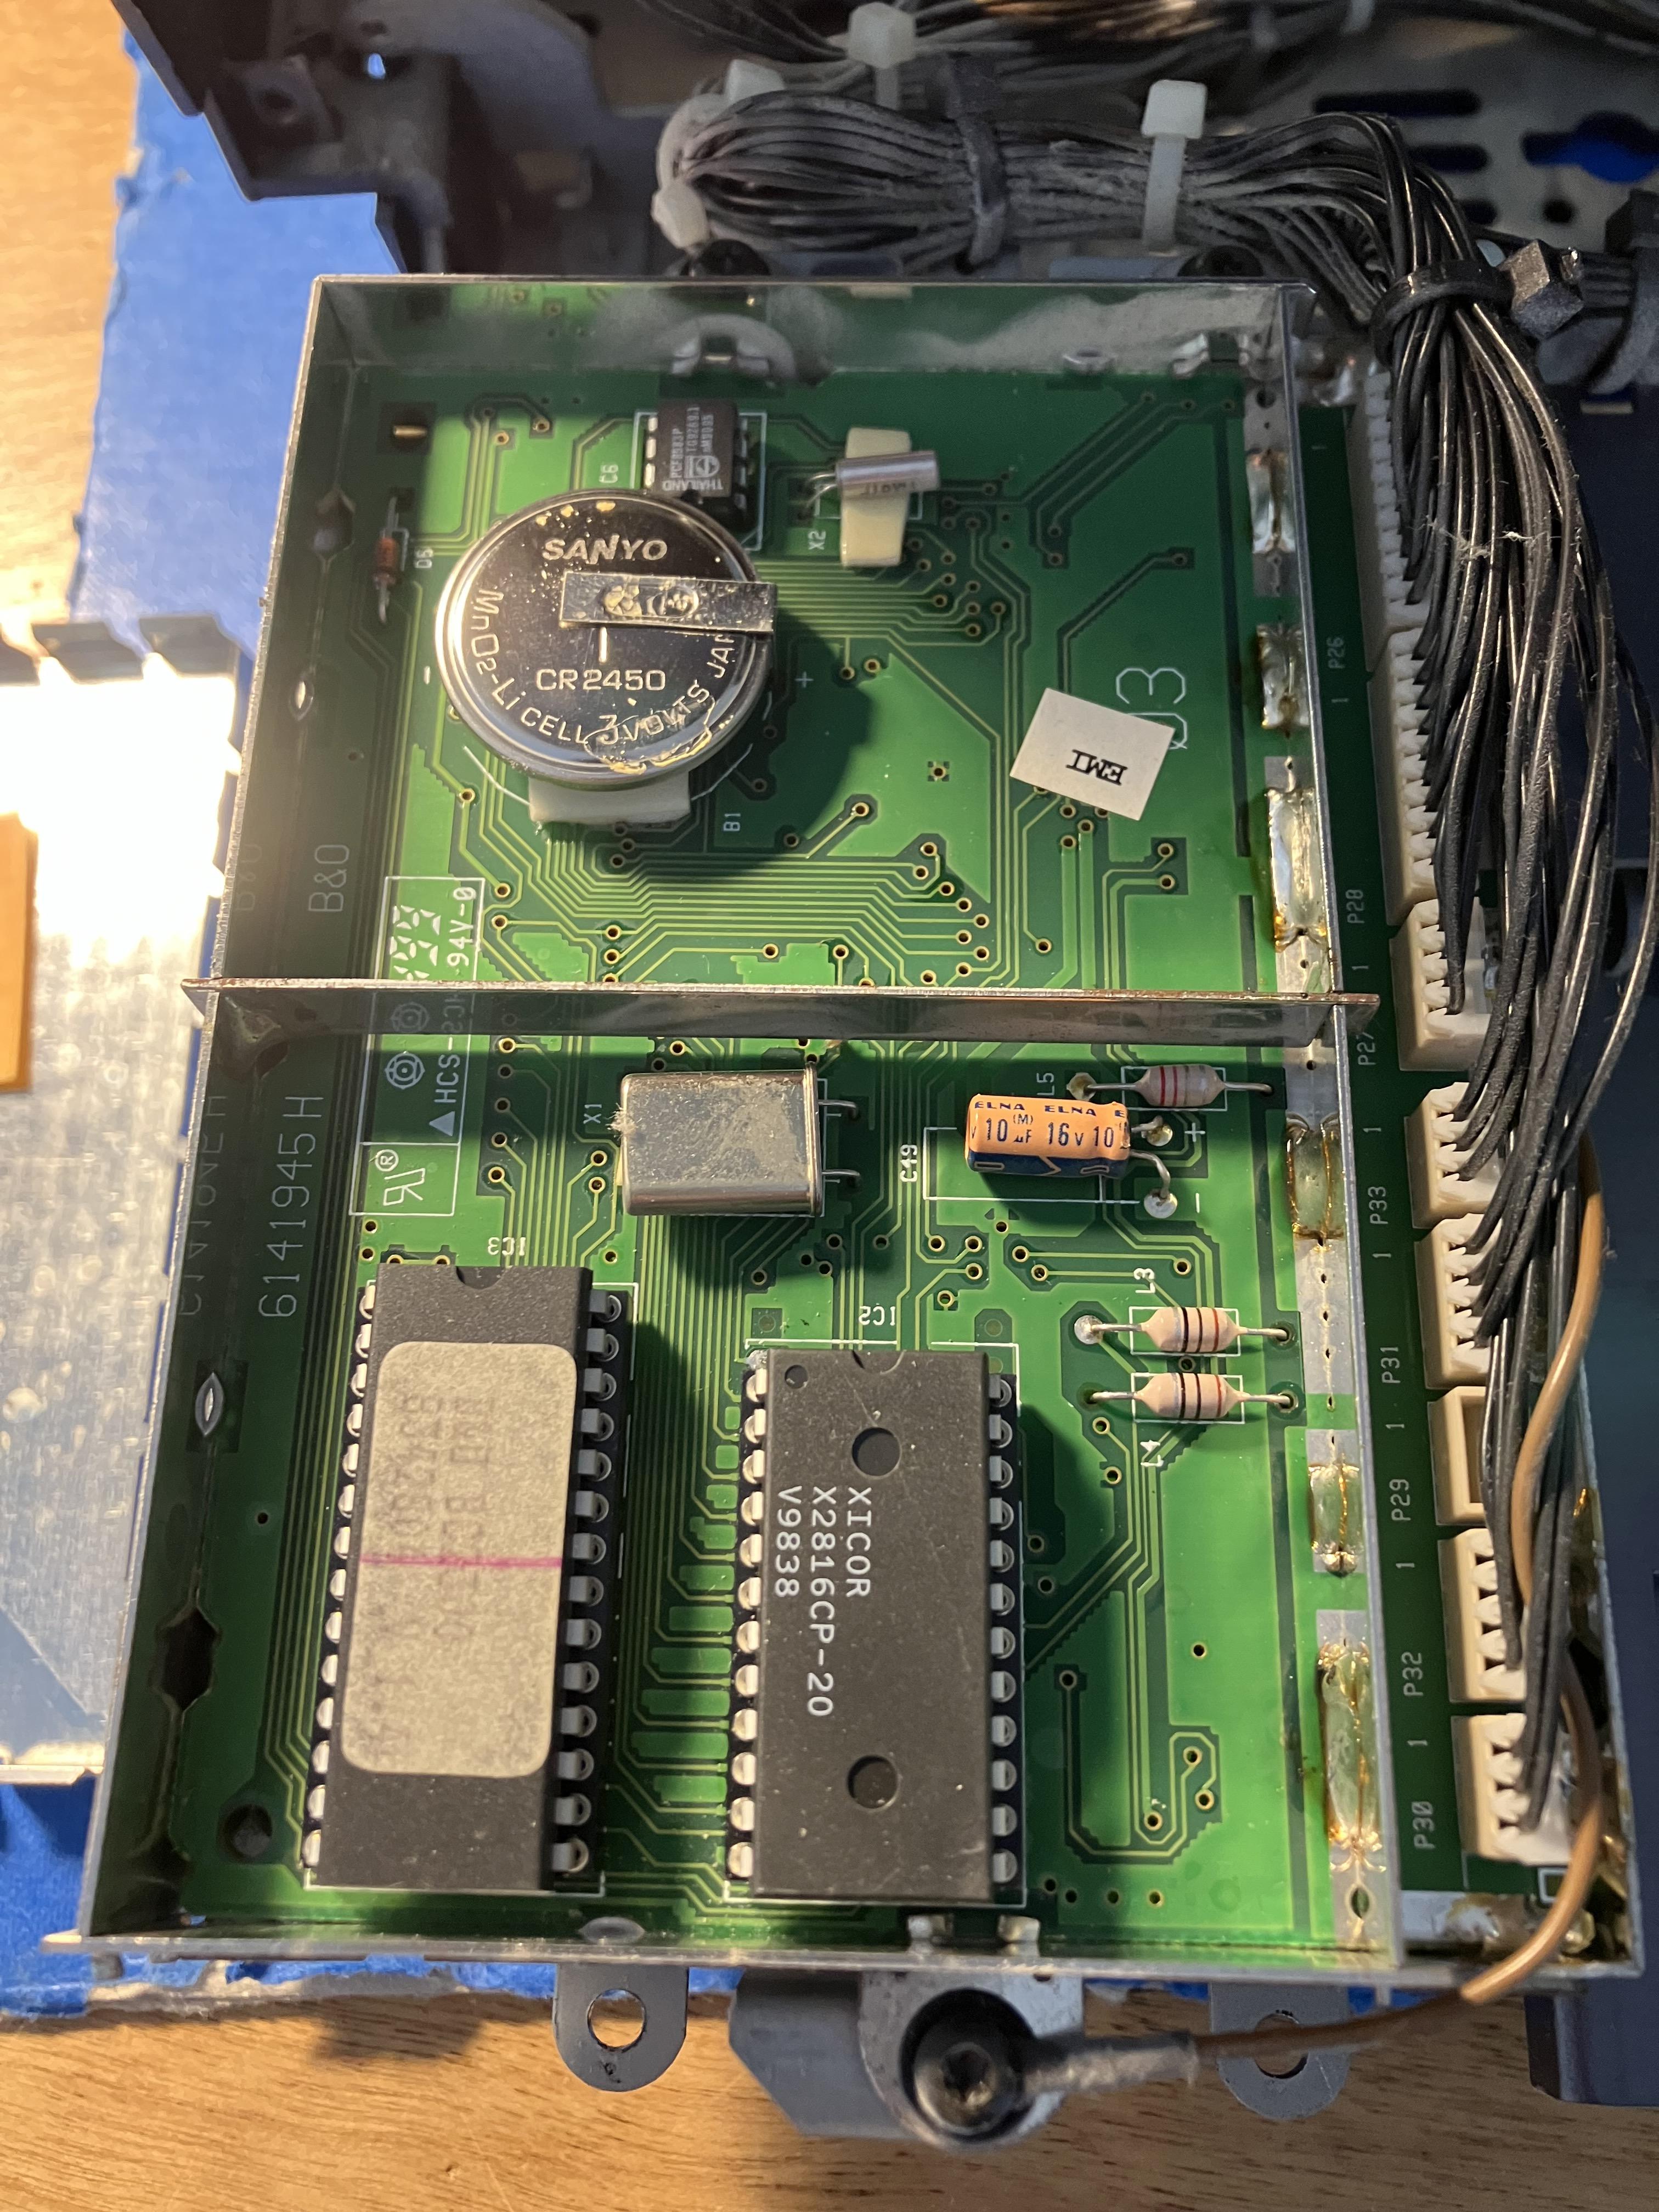
Under the cover on the left of the photo above:
(Will be replacing with this one from Farnell: https://uk.farnell.com/renata/cr2450-nfh-lf/cell-lithium-button-2pin-3v/dp/1319731
EDIT: The battery is not leaking below – it had a protective sticker on top and you can see the remnants of the glue.
 February 3, 2024 at 12:13 am #29339
I have added a PC board pin type battery holder for the CR240 for my BC9500.
Then it allows you to use normal button cells without desoldering in the future.
Be very careful when desoldering lithium batteries. Please wear safety glasses. Any leaking residue can cause a nasty “bang,” with lots of smoke if the it gets on the soldering iron tip.
February 3, 2024 at 1:59 pm #29347Thanks auric. I have soldered directly into a BC9500 in the past, but I will order some of those battery holders (found also on UK Amazon UK) and give that a go. I think there is space for the holder under the CPU cover, but if not I will carefully solder a battery.
Here’s the Amazon version with the correct 20.3mm PCB pitch: https://www.amazon.co.uk/gp/product/B0B692W13Q
February 27, 2024 at 10:02 pm #30448Quick update regarding my BC2300 CD problems:
All the spares (new laser, batteries, capacitors) arrived about a month ago, and finding myself with about an hour to spare I decided to replace the laser first. It was quite straightforward using the instructions within the YouTube videos linked earlier.
Anyway, on testing, the CD player burst into life and worked faultlessly, for about 20 minutes …. ? Then the same fault re-appeared and I couldn’t get it to play any CD again! I ran the test mode and am still getting the same ERR 2 focus error.
Pressing family matters mean that I am unlikely to investigate further for a few weeks (hence my absence from the forum recently), but when I do have time I plan to replace the SMD capacitors on the CD driver board. I did mean to do this first but didn’t have time to devote to my least favourite pastime of soldering!
I do worry that fitting a new laser to a faulty CD driver board may have damaged the laser, but hopefully my concerns are unfounded.
More to follow, but not for a while …
February 28, 2024 at 7:27 am #30461Note the note about cable and socket matching here:
Martin
February 28, 2024 at 11:11 am #30467Note the note about cable and socket matching here:
Hi Martin – yes I did have to trim the ribbon cable very slightly as described, so that it would go into the housing. When I next have time to disassemble I will double check that the ribbon is pushed fully home and will also have a look at the alignment of the contacts.
February 28, 2024 at 11:20 am #30469Anyway, on testing, the CD player burst into life and worked faultlessly, for about 20 minutes …. Then the same fault re-appeared and I couldn’t get it to play any CD again! I ran the test mode and am still getting the same ERR 2 focus error.
Pitty that it was not enough. I might have to do some more playning for a longer time to see if my BS Ouverture is stable for a longer period of time. I never got the ERR 2 focus error though.
Note the note about cable and socket matching here: https://www.beoparts-shop.com/product/cdm12-4-laser-module-beocenter-2300-2500-beosound-3000-4000-ouverture-a-o/ Martin
@Martin: The text you are linking to also mentions laser units with F8 <> 2 printed on the cable. If this text should be there would it be in this place (from one of my replaced lasers where the text is different):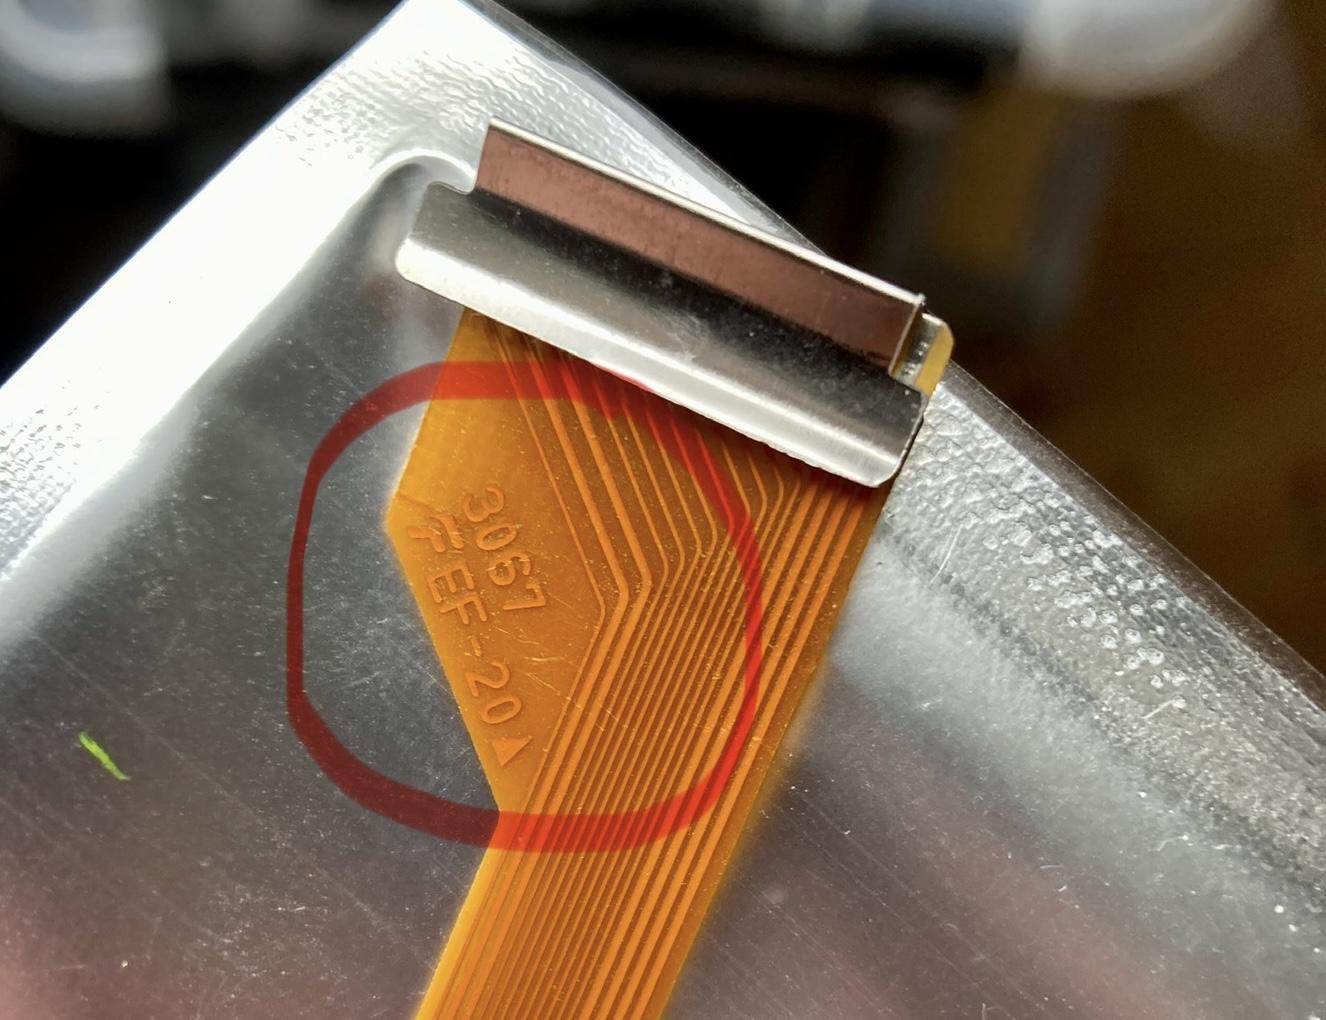
When I next have time to disassemble I will double check that the ribbon is pushed fully home and will also have a look at the alignment of the contacts.
I might also look into this the next time I look at my Ouverture.
March 29, 2024 at 2:53 pm #31885So after a month of not working on my BC2300 I have today dug out my soldering iron and replaced the CD driver board capacitors.
Board after removal of SMDs:
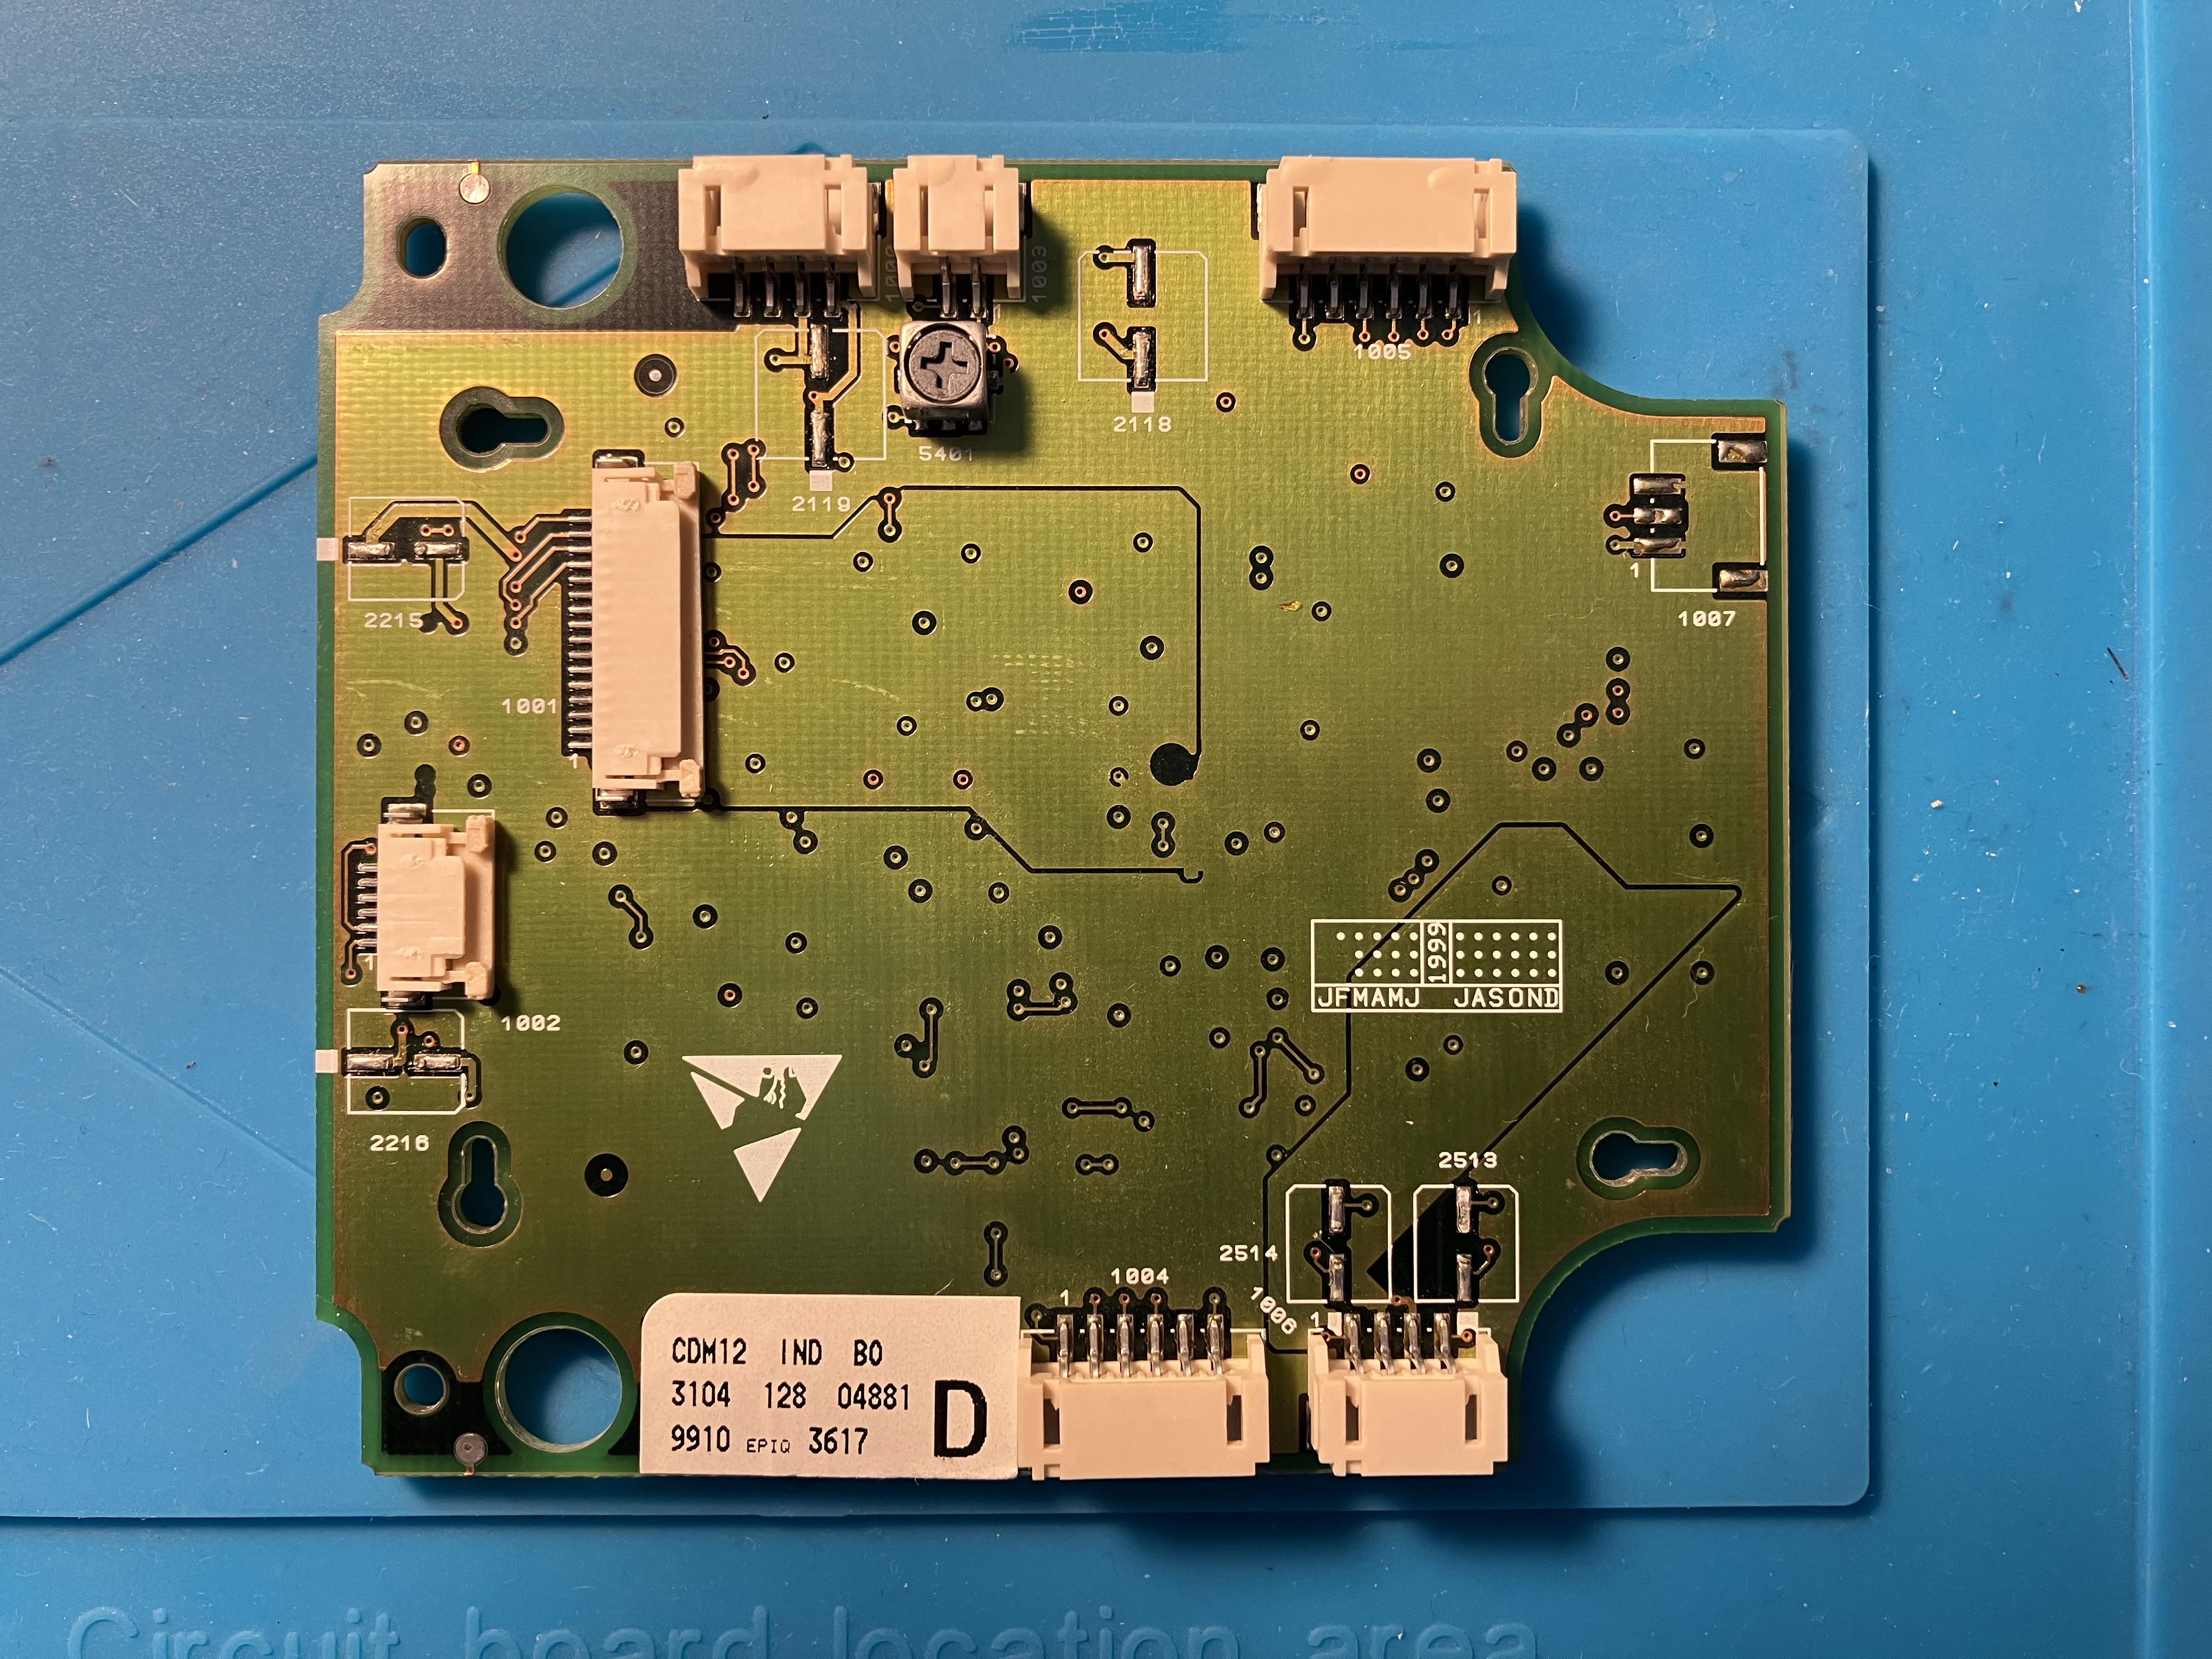
And with the new capacitors, all Panasonic apart from the (blue) 330 uF which is a VISHAY. I had to be very careful to orientate the capacitors so that they do not interfere with the CD laser movement. The large VISHAY was tricky and I had to bend both legs into an L-shape in the same direction, soldering the hidden +ve foot first and then bending it forward to solder the -ve lead. It now fits nicely into a groove in the side of the CD mechanism.
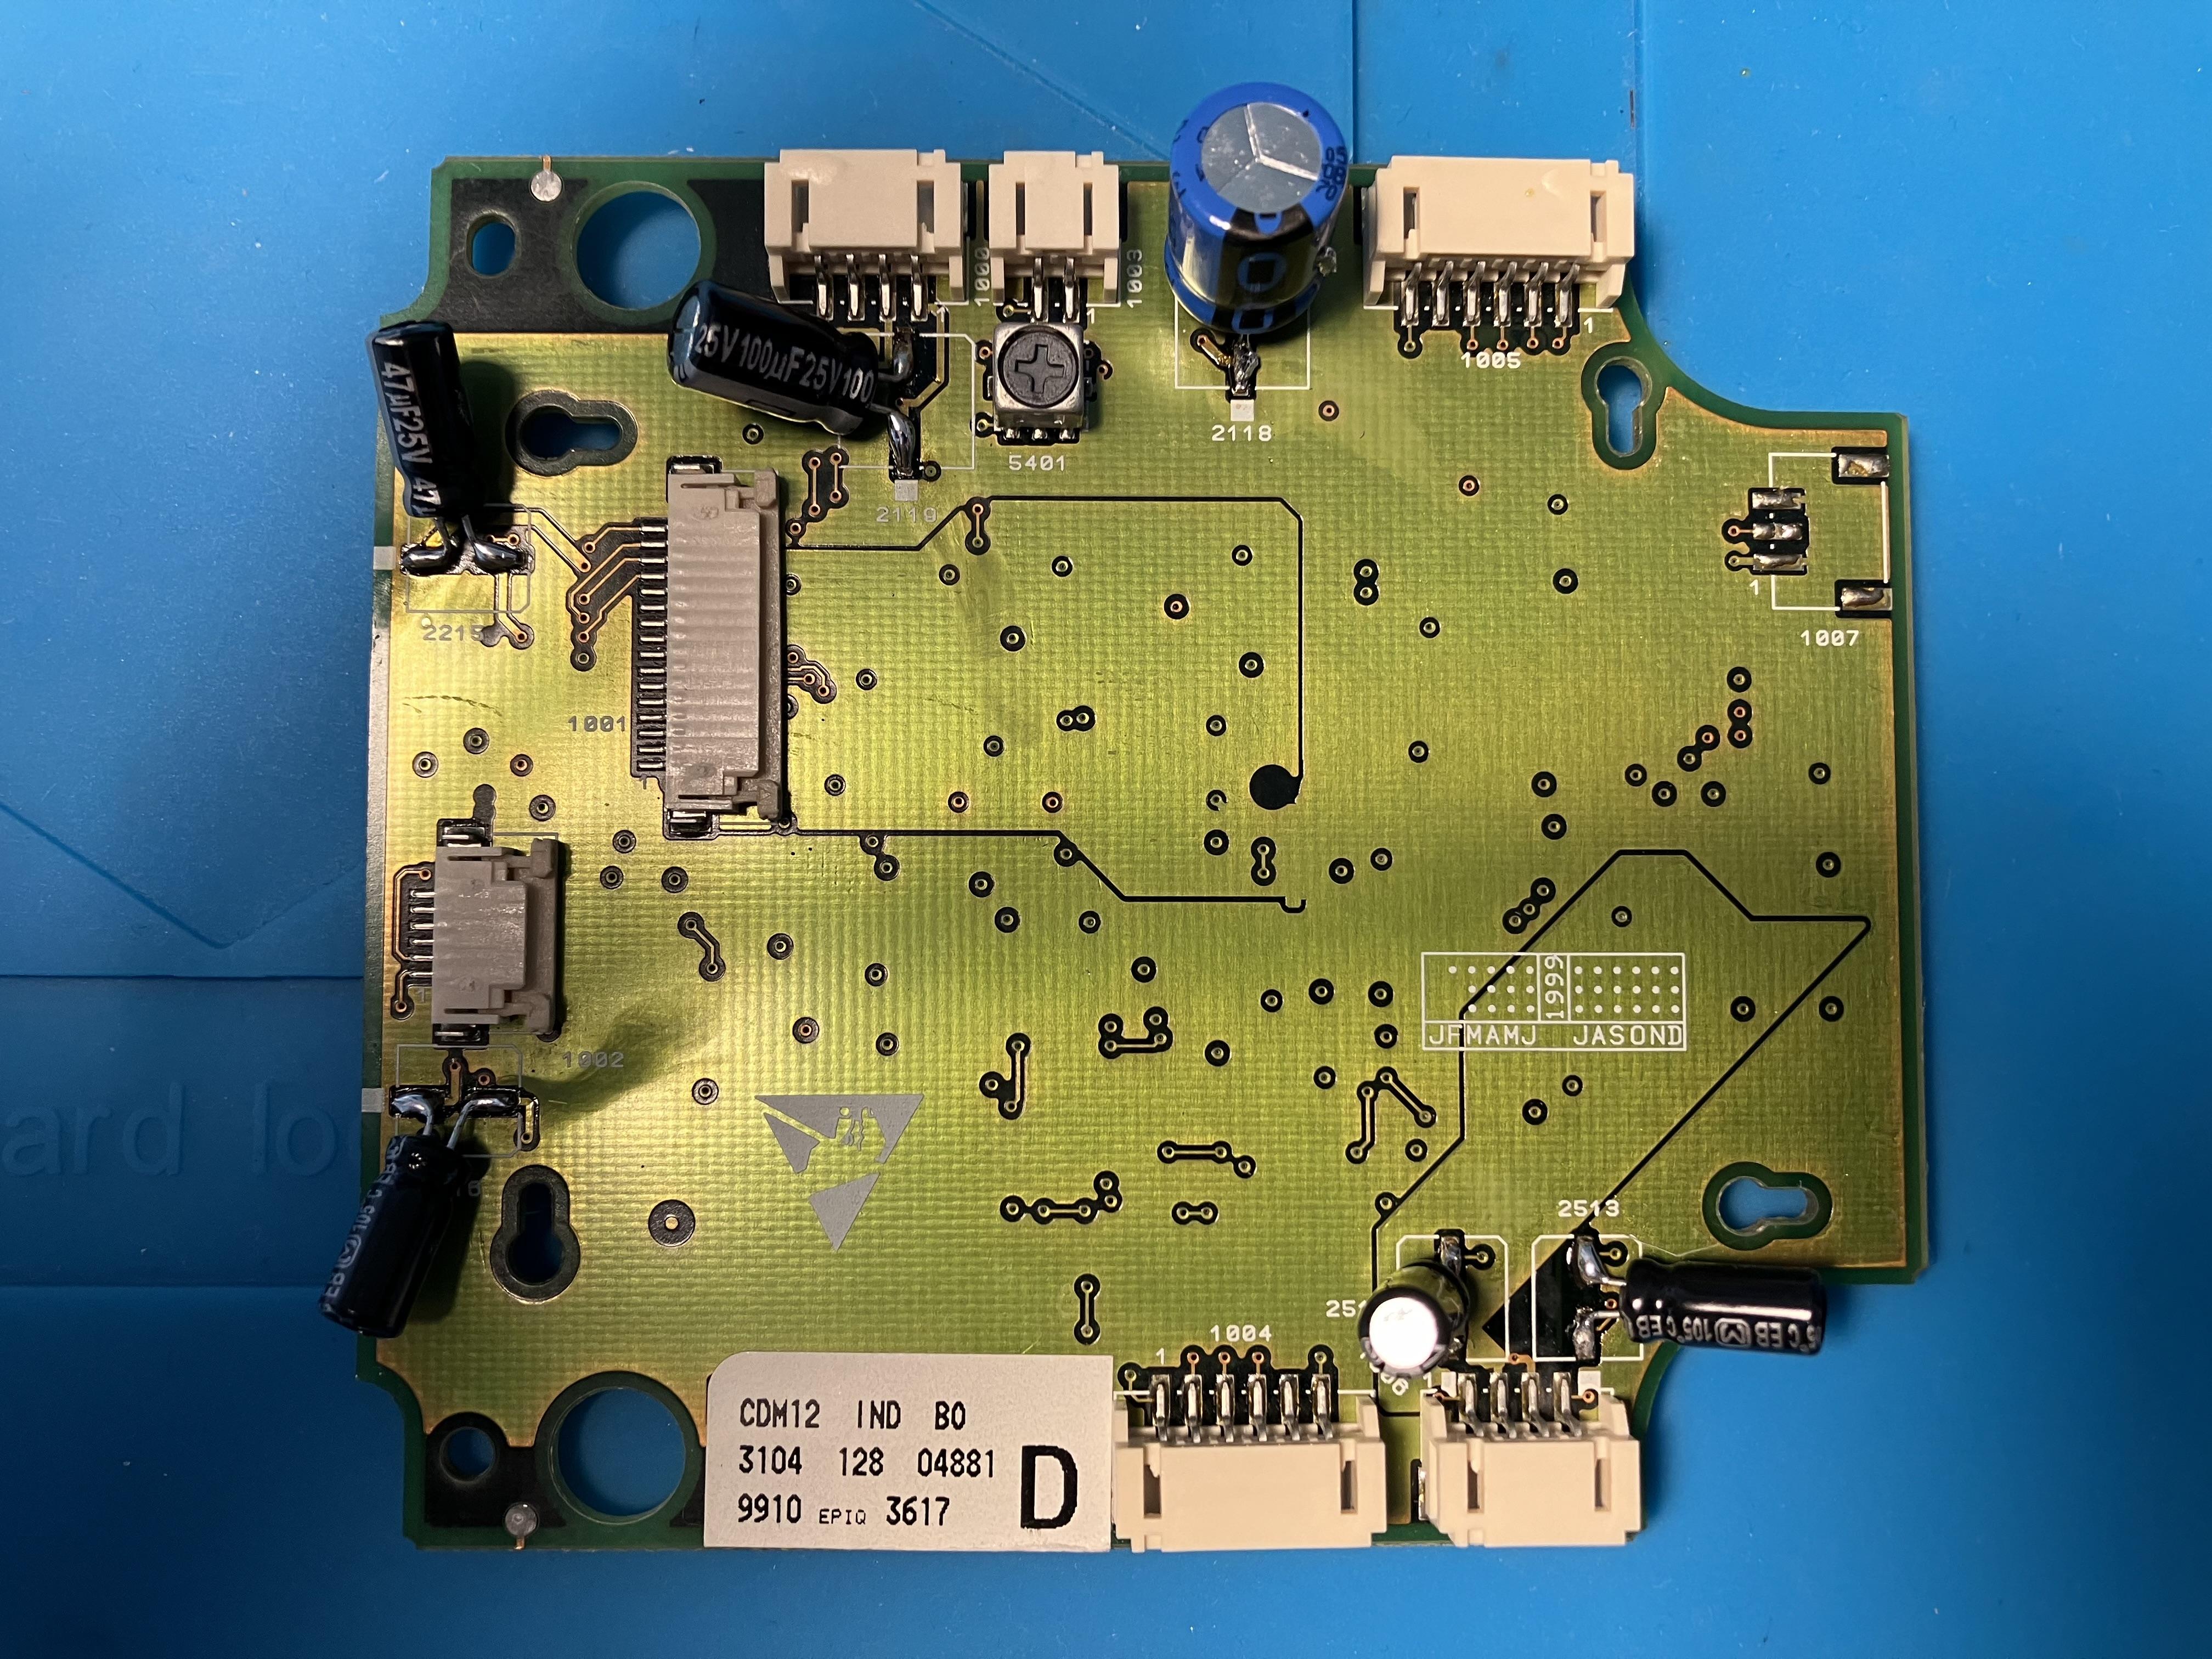
And guess what? I put it back together and it works, and for more than 20 minutes this time!! It is a Good Friday! ?
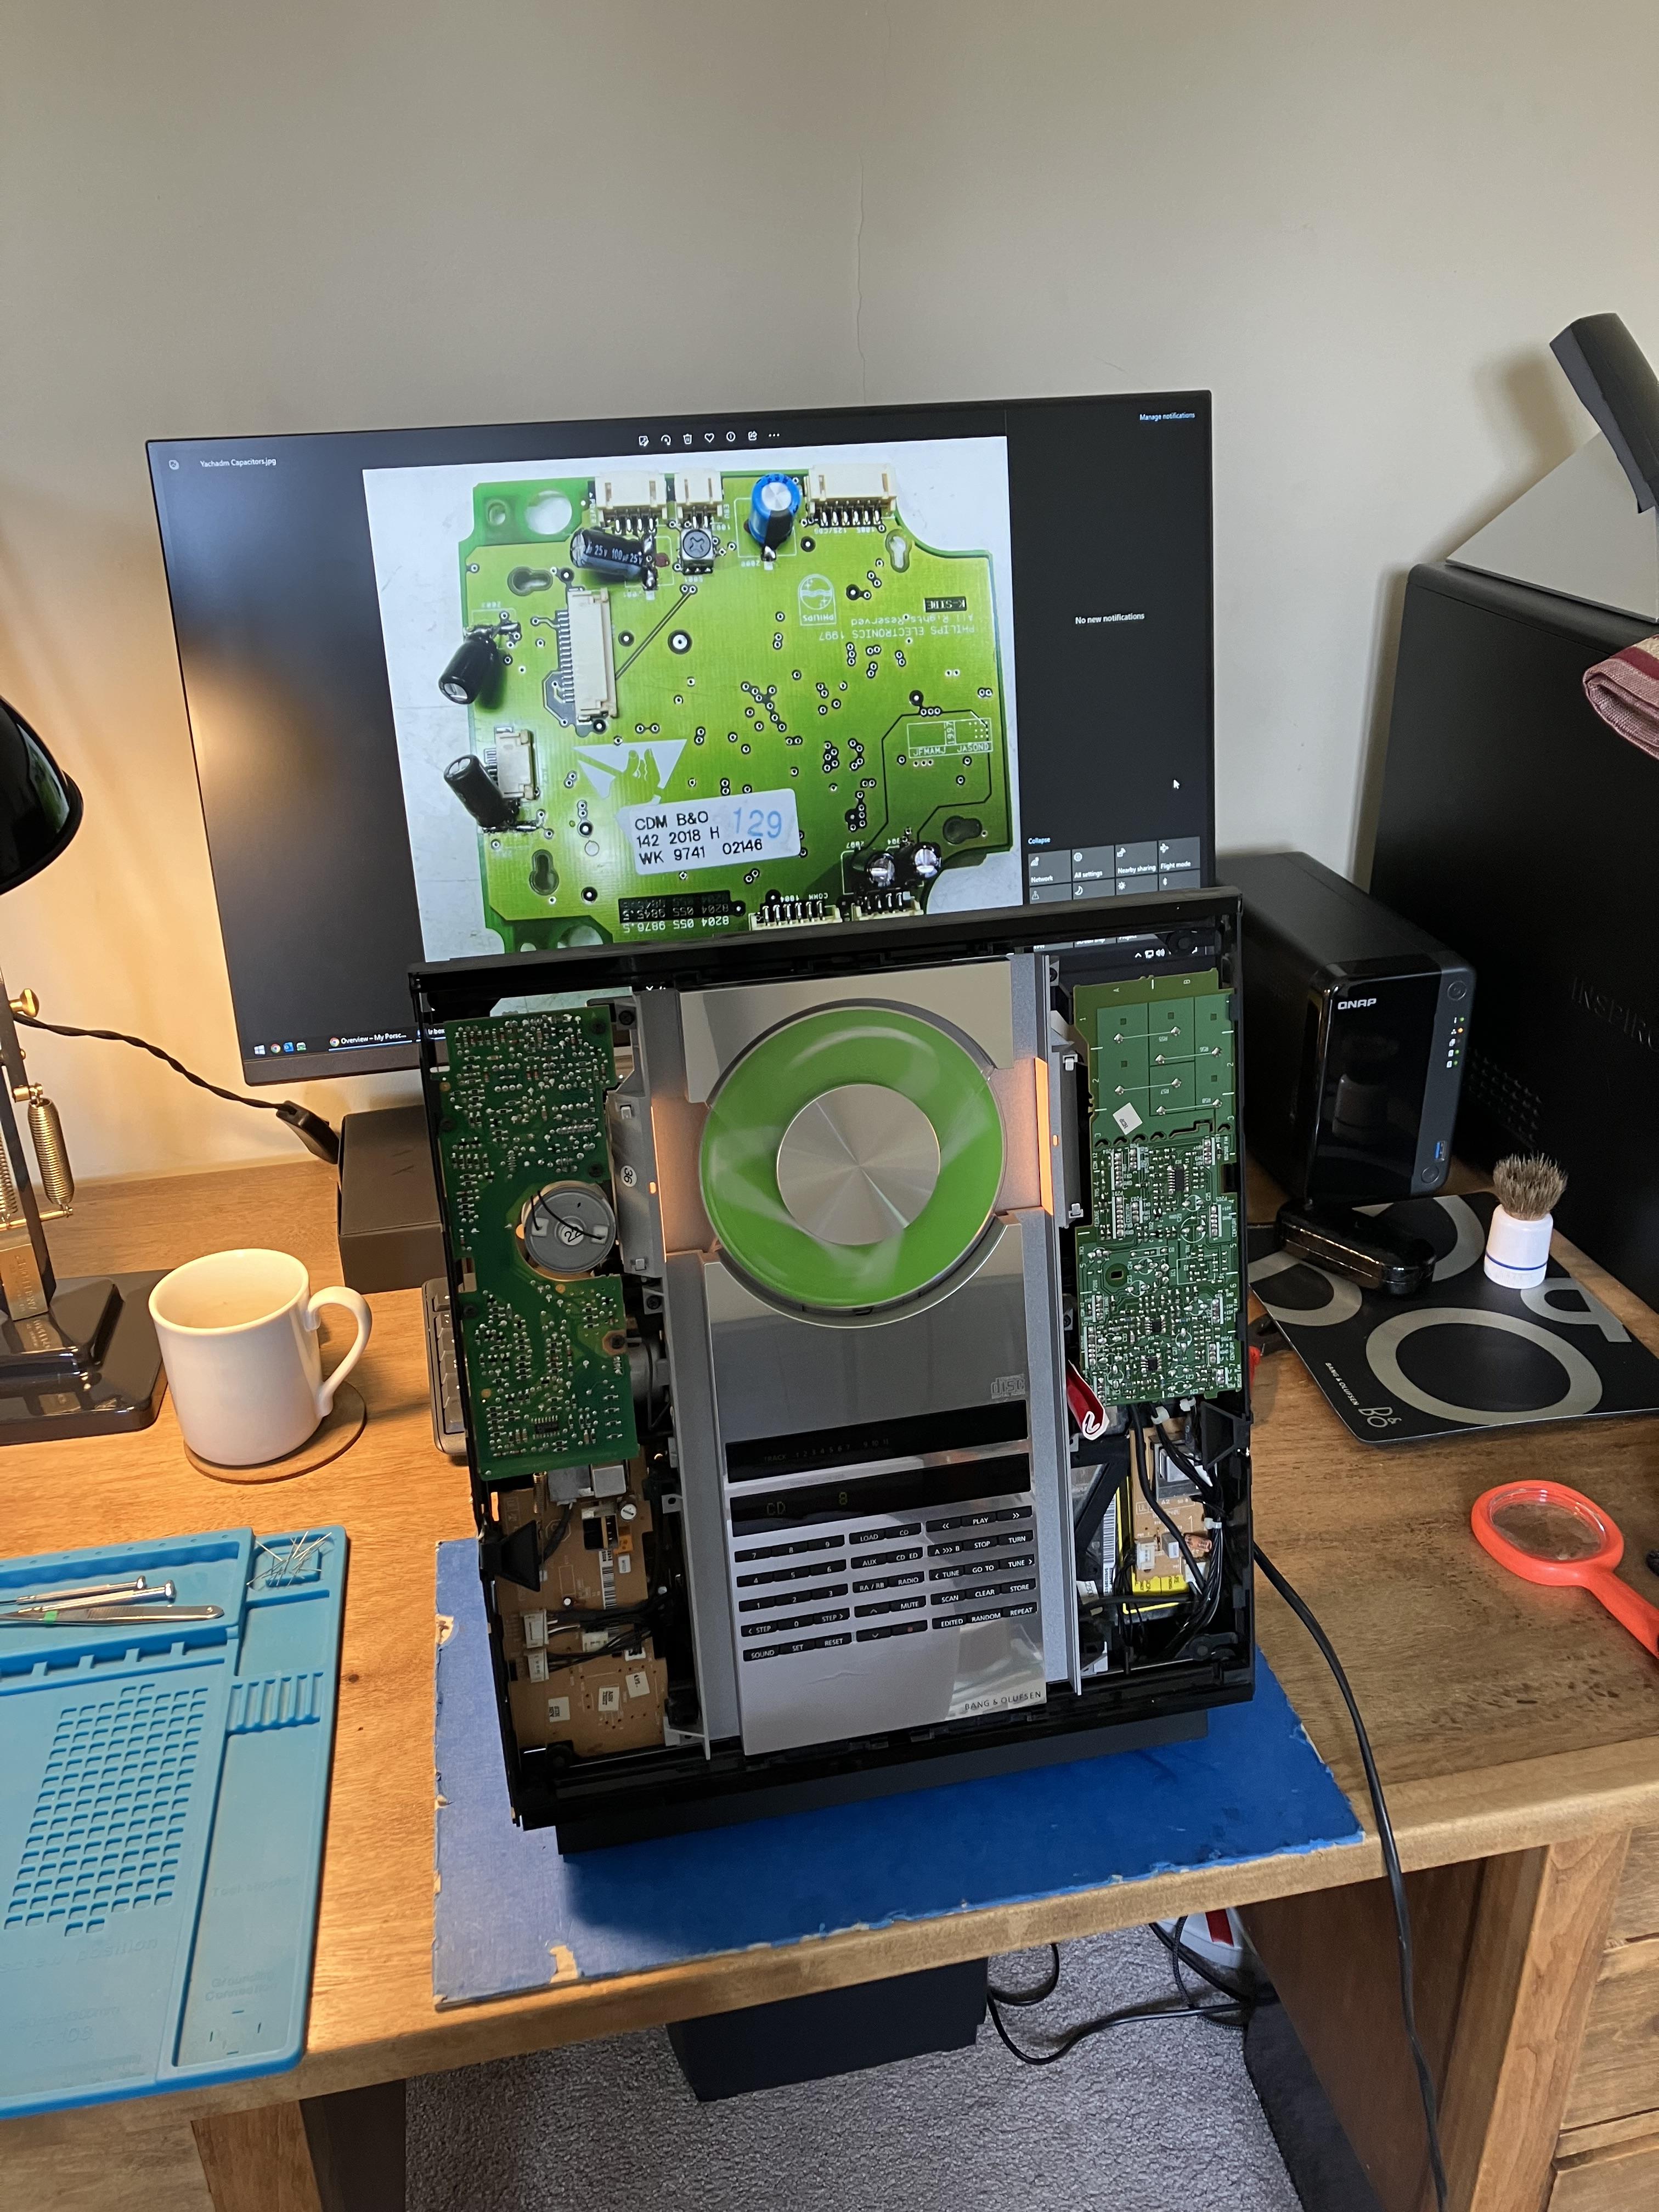
Note the picture of Beoworld member yachadm’s soldered CD board on the PC screen behind which was used for inspiration (although I orientated a couple of my capacitors in different directions), and many thanks to madskp and Dillen for their help and encouragement. I have left the new Beoparts laser fitted but will keep the one that I removed (as it is probably serviceable) for future repairs of other kit.
I will be giving the BC2300 an extended test before full re-assembly, and potentially do the other jobs (belts, adjustment of display brightness and battery replacement).
EDIT: Links to capacitors used, for reference:
March 29, 2024 at 6:50 pm #31908And guess what? I put it back together and it works, and for more than 20 minutes this time!! It is a Good Friday!
Nice to hear that it did the trick, and the soldering time was not wasted 🙂
and potentially do the other jobs (belts, adjustment of display brightness and battery replacement).
I can only recommend doing the belts while it’s open based on both my Ouverture and some other things I have worked on
March 29, 2024 at 6:53 pm #31909And I might have to revisit my Ouverture to see if I can get it fully working. Maybe one of the caps I put in it have slipped the board
March 30, 2024 at 10:28 am #31940adjustment of display brightness
Hi Guy,
How do you do that ? Mine would need this !
–Edit–
Ok, got it! Too much time away from Service Manuals!
March 30, 2024 at 10:41 am #31945^ Funny you should ask – I actually did it yesterday!
Here’s a quick photo of the display board removed for access – the two adjustments are circled in red (one for each display panel):
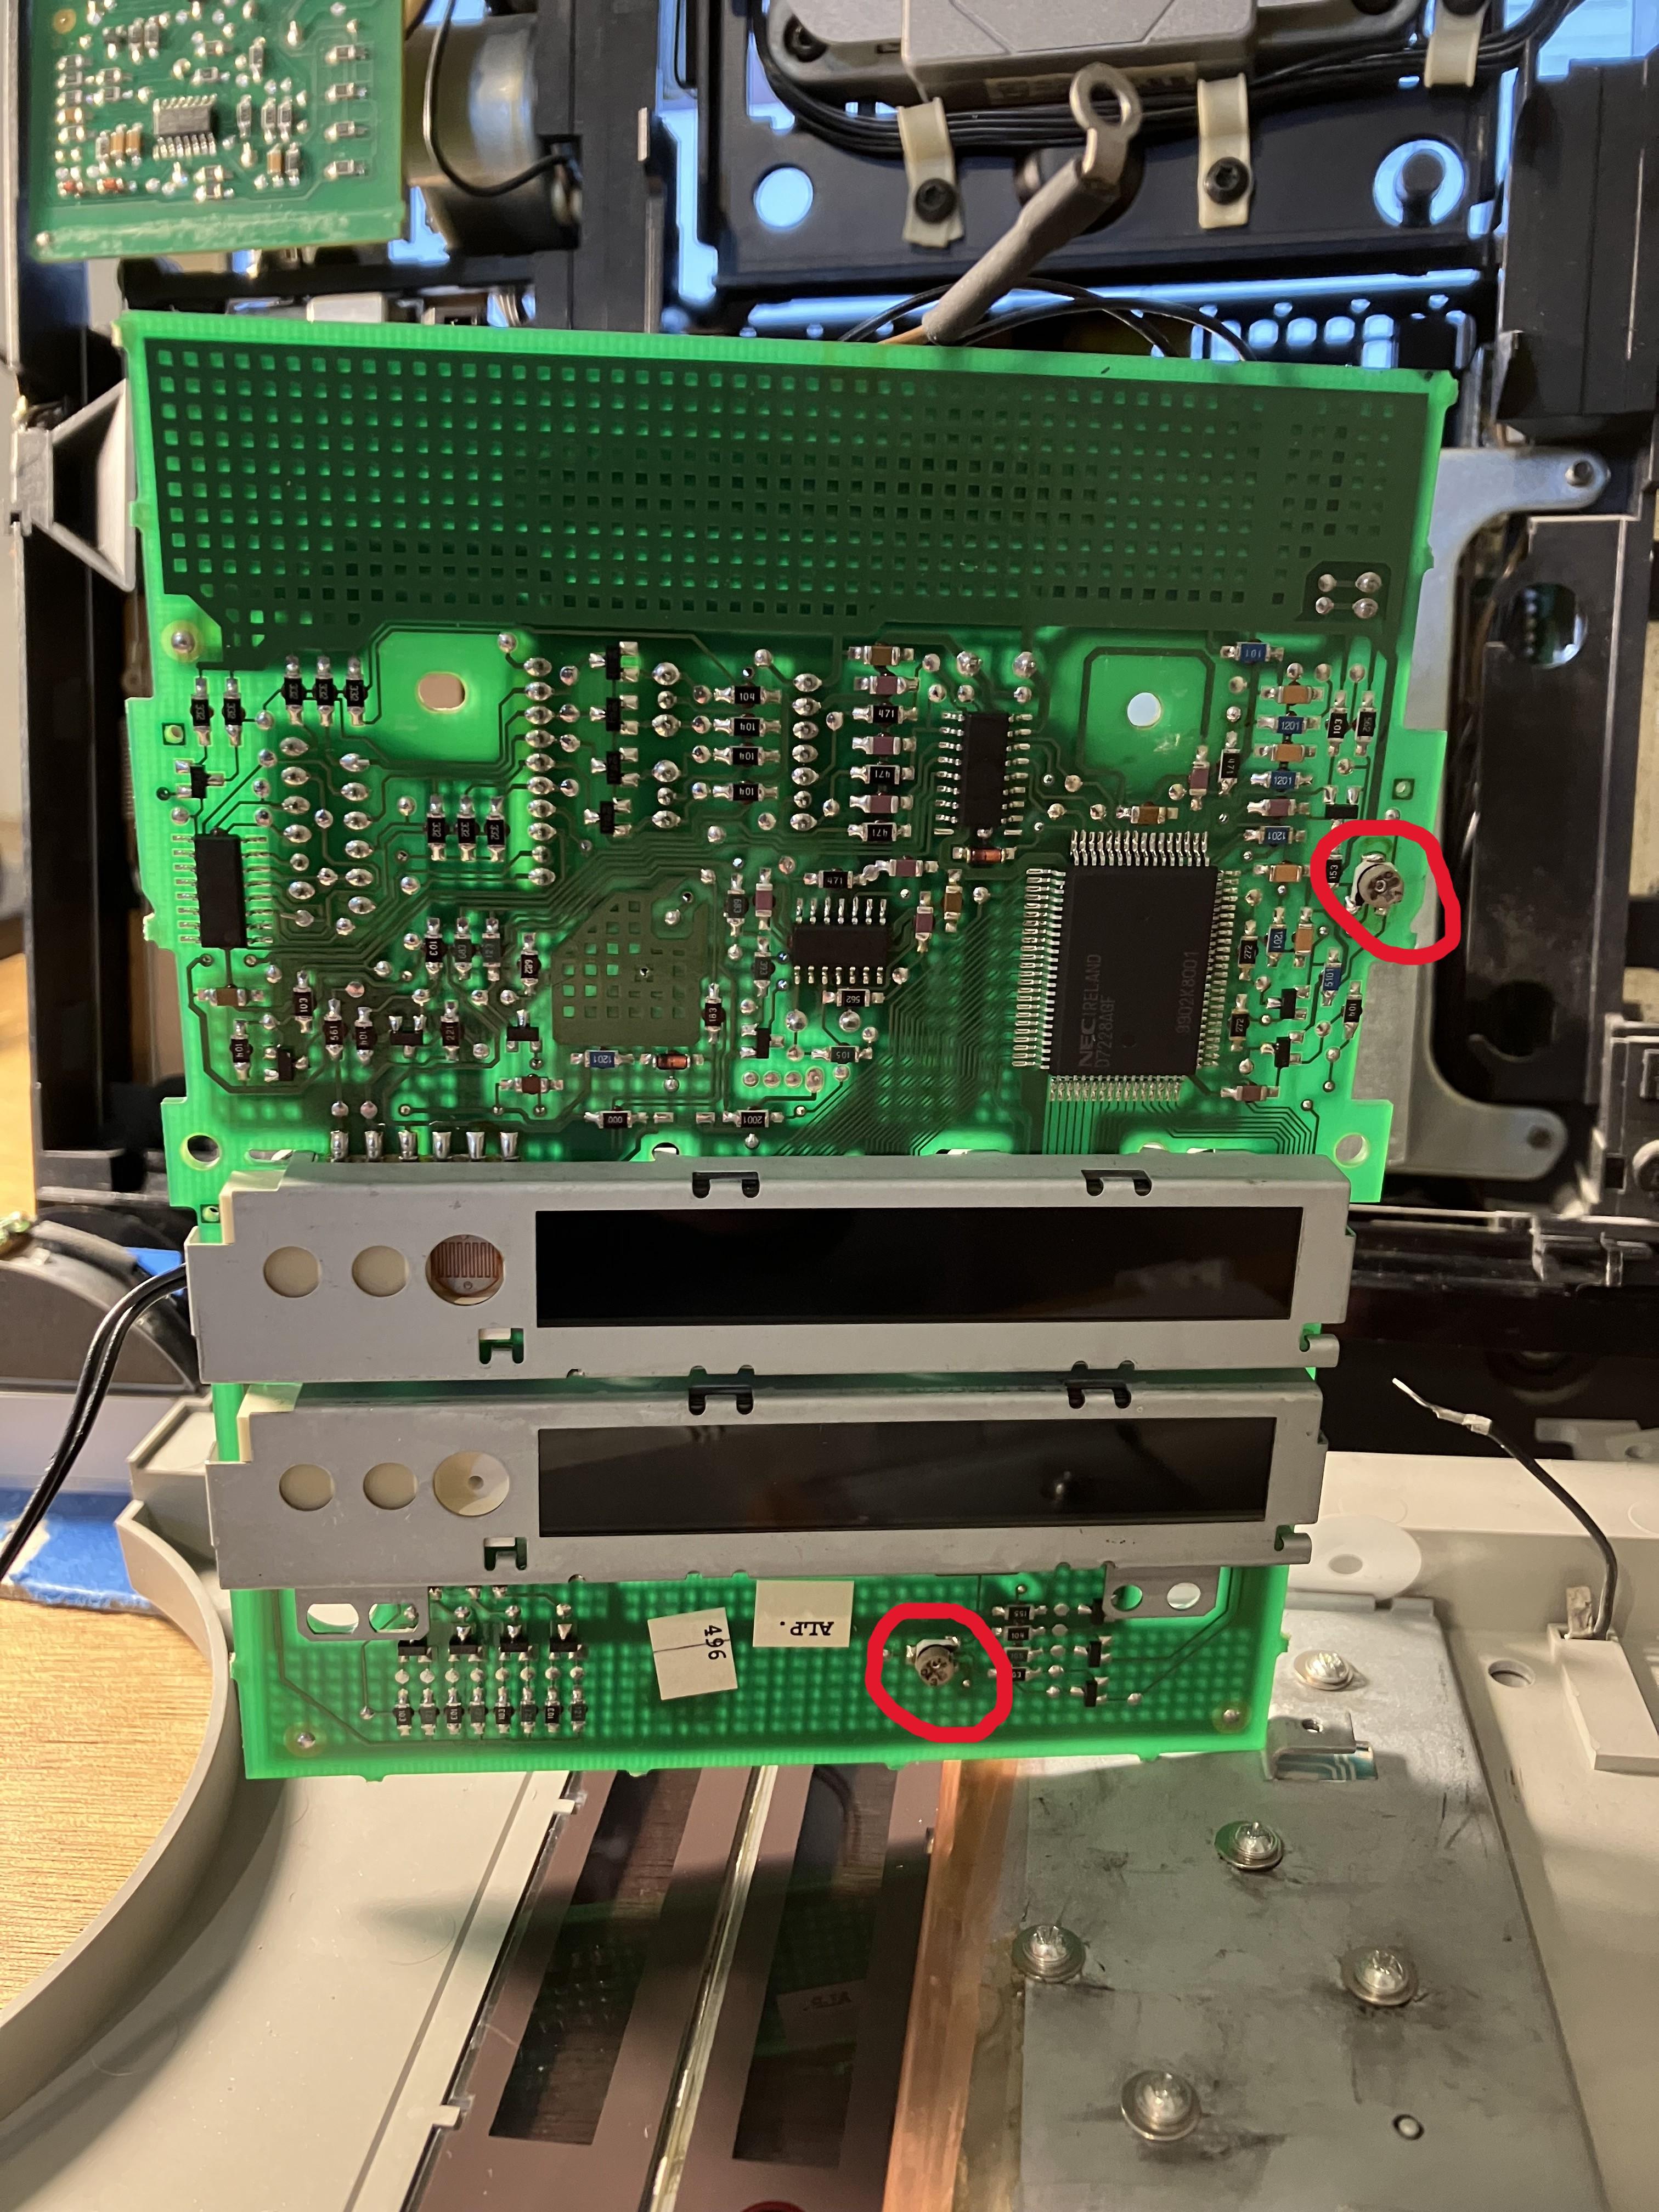
I actually reconnected and powered it up to adjust. This is a bit tricky because you need to spin up the CD to get the track numbers to chow on the upper display – I pressed my finger lightly against the CD centre to keep it in place for initial ‘spin up’.
The potentiometers will actually turn through 360 degrees past the maximum point, hence needing to have the display powered for adjustment. I set mine to maximum, which is fine if you view the display head-on, but there is too much surrounding glow if you view from an angle. So I may well turn mine back down again before re-assembly.
EDIT: Some spotters may have noticed the rather ‘Heath Robinson’ screws at the bottom of the photo above. These are fixing the rear of the keypad in place, and came as part of the official B&O keypad repair kit (new dome foil etc) that was my very first ever B&O repair back in 2008.
March 30, 2024 at 5:12 pm #31976Thank you, It’s helpful to see the trimmers in real.
What could be the purpose of the component next to the lower (upper in your picture) display? It looks like a light sensor?
–After checking it–
It is a light sensor to adjust the brightness of the display. Never noticed it or maybe I have just forget it was there.
March 30, 2024 at 8:58 pm #31988I am now able to check my display in the dark and it is far too bright! (the non-lit ‘pixels’ are glowing too much which reduces clarity). I’ll re-adjust tomorrow, probably back to where I started. It’s a bit of a faff to adjust so I actually wish I’d never attempted. So if you can live with yours as it is then I recommend doing nothing!
On a positive note, I replaced both belts today – first time I have tried that and it was a bit tricky but successful. I also replaced the lithium battery – I (carefully) soldered a new battery directly rather than use a socket because the sockets I bought were a bit large and may have pushed against the upper shielding. Given that this is the first battery change in 20+ years I reckon that the replacement will probably outlive me. (Old battery measured 2.86V no load, new one was 3.2V).
I had to adjust the FM offset after the battery change. This didn’t work the first few times and I think there may be an error in the manual. It tells you to use TESTMODE, tune to a known station and then press GOTO, input correct freq then press STORE. I found that I had to press STORE twice before the display would show OK and it would register. I haven’t bothered with AM offset. (EDIT: I just checked Talk Sport on 1053kHz and it worked fine, so no need to adjust)
So other than re-adjusting the screen brightness and re-assembling I am finished. Apologies for hijacking madskp’s thread for the non-CD-related activities but I wish him all success in getting his Ouverture fully functional.
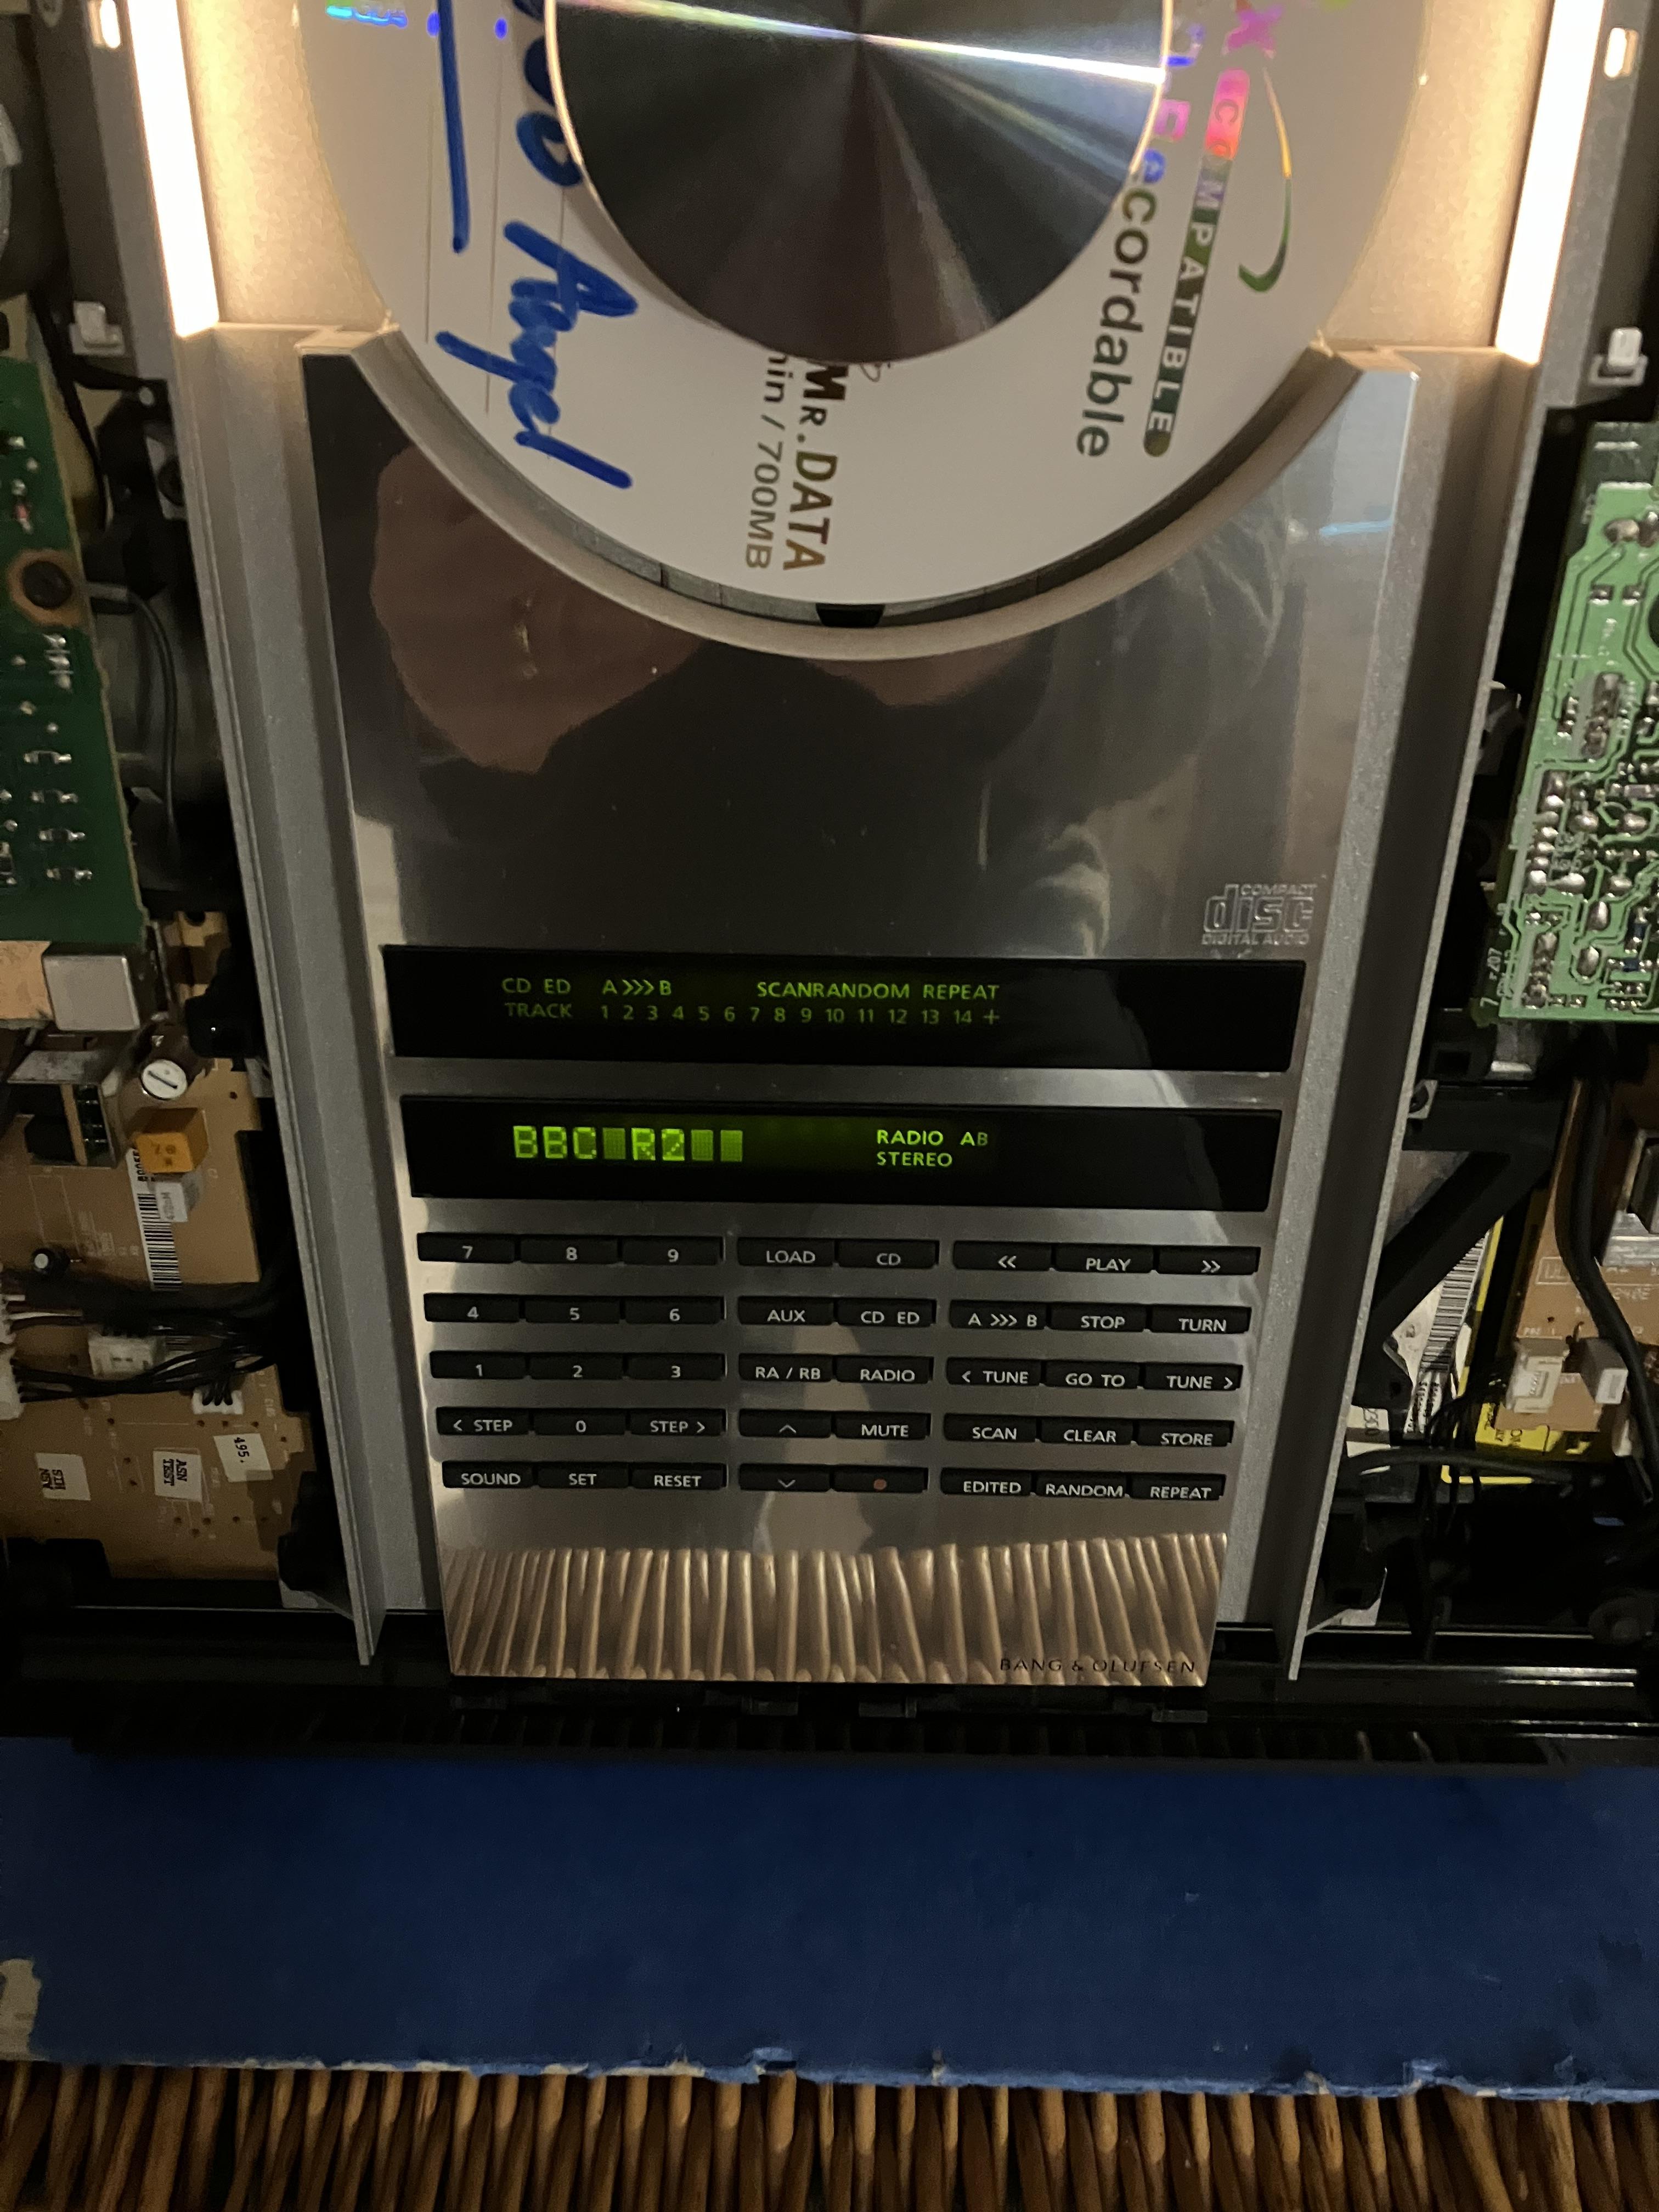
March 30, 2024 at 9:33 pm #31991Quick photo of display with contrast too high (do I mean too low?) – only BBC R2, RADIO A and STEREO should be visible! It is much better viewed direct on, rather than at an angle.
 March 31, 2024 at 9:02 am #32000
I am now able to check my display in the dark and it is far too bright! (the non-lit ‘pixels’ are glowing too much which reduces clarity). I’ll re-adjust tomorrow, probably back to where I started. It’s a bit of a faff to adjust so I actually wish I’d never attempted. So if you can live with yours as it is then I recommend doing nothing!
Good to know. I have not noticed any issuses with brighness on my Ouverture, but if I do at one point I might have to consider what I can live with.
On a positive note, I replaced both belts today – first time I have tried that and it was a bit tricky but successful.
Yes they are tricky. When I did it I ended up re wirering the doors as I probably had disassembled the mechanism to much. But with the extra lenght there was in the existing belts I have no doubt that belt change is mandatory.
I also replaced the lithium battery – I (carefully) soldered a new battery directly rather than use a socket because the sockets I bought were a bit large and may have pushed against the upper shielding
Also good to know in order to get the right battery from the start.
Given that this is the first battery change in 20+ years I reckon that the replacement will probably outlive me. (Old battery measured 2.86V no load, new one was 3.2V).
And based on that, you are right, that next battery replacement is probably not worth thinking on.
Apologies for hijacking madskp’s thread for the non-CD-related activities but I wish him all success in getting his Ouverture fully functional.
No need to apologise. Allways great with extra inputs, especially since my Ouverture is still open. I would hate to find out that I should have done this little extra thing when I had just reassembled the whole thing 😉
March 31, 2024 at 9:03 am #32001Quick photo of display with contrast too high (do I mean too low?) – only BBC R2, RADIO A and STEREO should be visible! It is much better viewed direct on, rather than at an angle.
Very good illustration of how it should not be 🙂
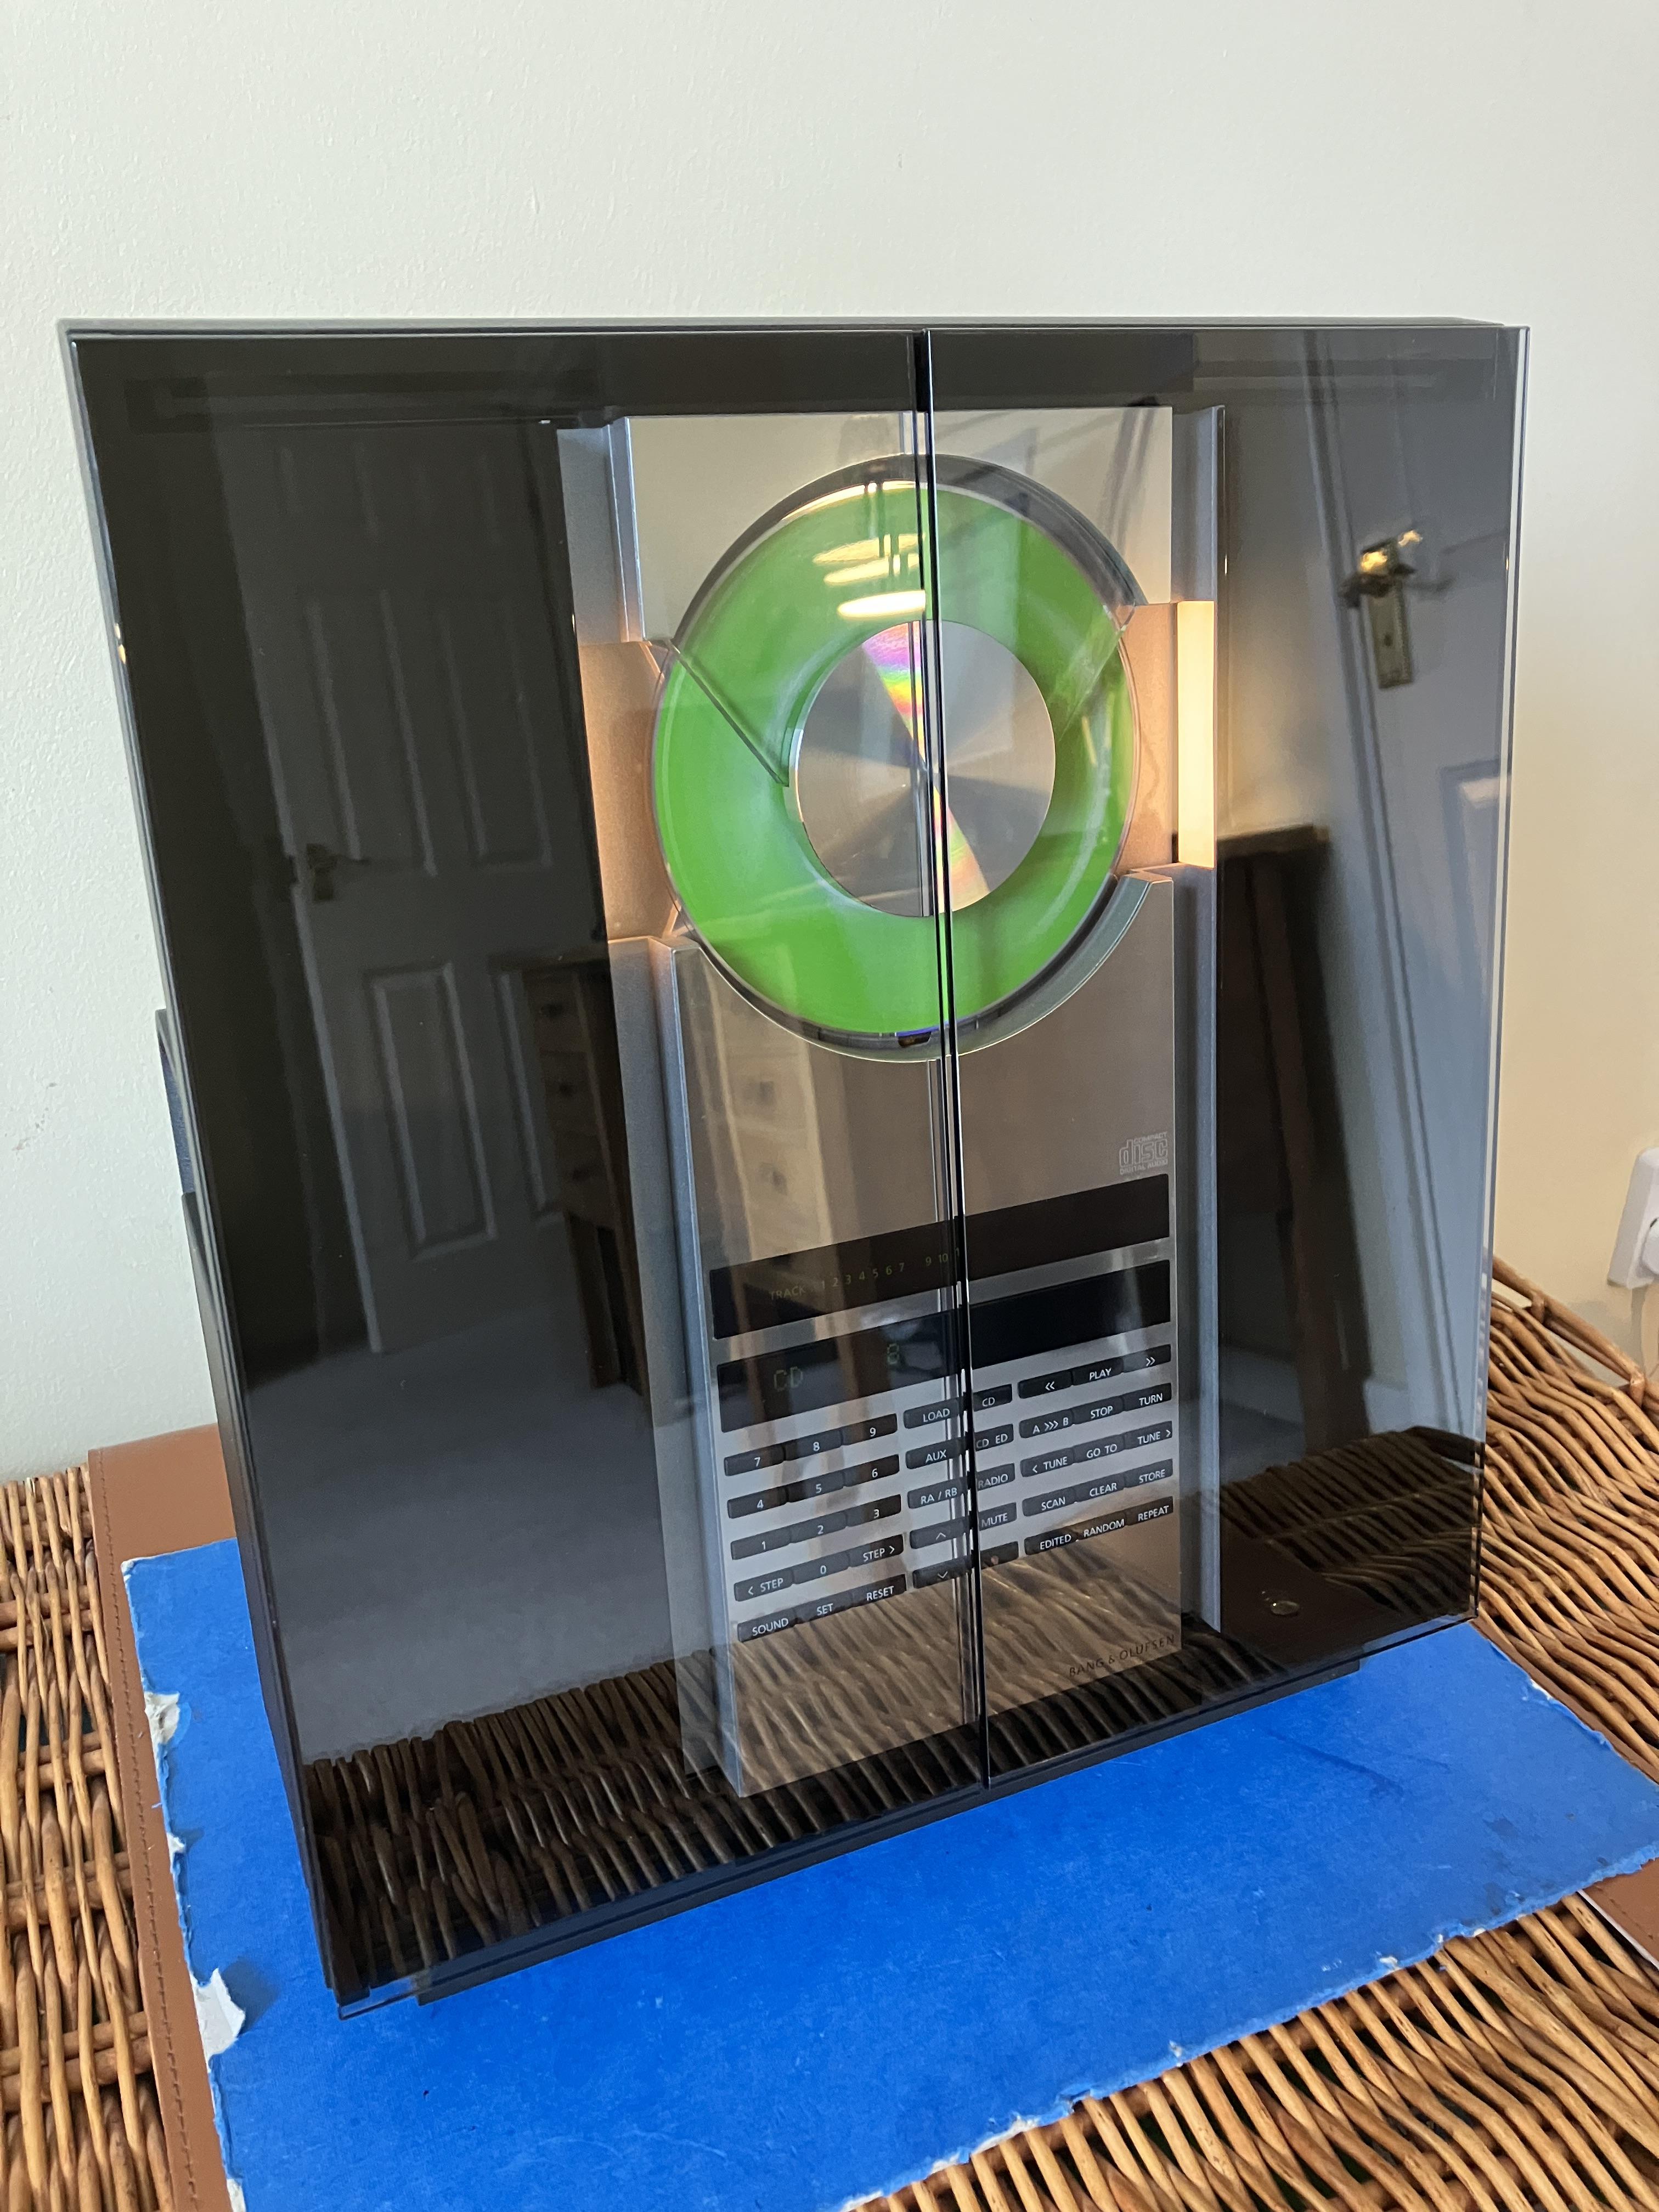
March 31, 2024 at 2:29 pm #32014All back together now …
- AuthorPosts
- You must be logged in to reply to this topic.
